While some plug-ins work right out of the box, some may require configuration before they can be used. For example, most of the core import plug-ins need configurations in the form of regular expressions to be able to find headers and data in the data files and the Base1PluginExecuter uses configurations to store information about the BASE version 1 plug-ins.
Configurations are managed from a plug-in's single-item view page or from the → → page.
Click on the button to create a new configuration.
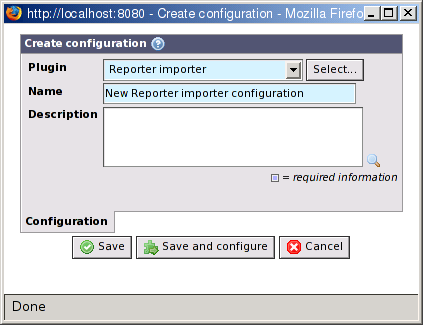
- Plugin
The plug-in this configuration belongs to. This cannot be changed for existing configurations. Use the button to open a pop-up window where you can select a plug-in.
- Name
The name of the configuration.
- Description
A description of the configuration (optional).
![[Note]](../../gfx/admonitions/note.gif) |
Note |
|---|---|
| You cannot create configurations for plug-ins that does not support being configured. |
Use the button to save the configuration or the button to save and then start the configuration wizard.
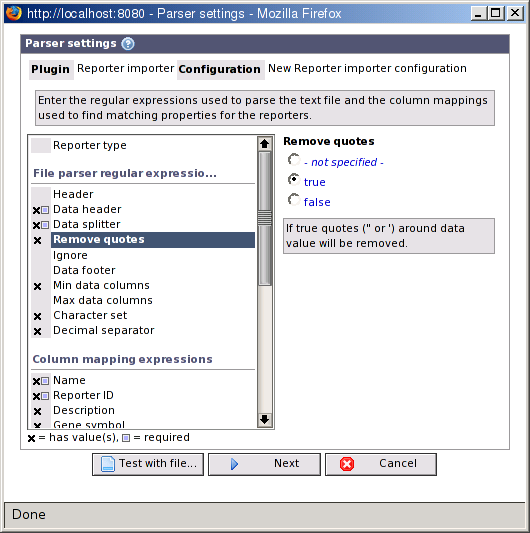
Configuring a plug-in is done with a wizard-like interface. Since the configuration parameters may vary from plug-in to plug-in BASE uses a generic interface to enter parameter values. In short, it works like this:
BASE asks the plug-in for information about the parameters the plug-in needs. For example, if the value is a string or number or should be selected among a list of predefined values.
-
BASE uses this information to create a generic form for entering the values. The form consists of three parts:
The top part: Displays the name of the selected plug-in and configuration.
The left part: Displays a list of all parameters supported by the plug-in. Parameters with an X in front of their names already have a value. Parameters marked with a blue rectangle are required and must be given a value before it is possible to proceed.
The right part: Click on a parameter in the list to display a form for entering values for that parameter. The form may be a simple free text field, a list of checkboxes or radiobuttons, or something else depending on the kind of values supported by that parameter.
-
When the user clicks the entered values are sent to the plug-in which validate the correctness. The plug-in may return three different replies:
ERROR: There is an error in the input. BASE will redisplay the same form with any additional error information that the plug-in sends back.
DONE: All parameter values are okay and no more values are needed. BASE will save the values to the database and finish the configuration wizard.
CONTINUE: All parameter values are okay, but the plug-in wants more parameters. The procedure is repeated from the first step.
|
Do not go back |
|---|---|
| It is not possible to go backwards in the wizard. If you try it will most likely result in an unexpected error and the configuration must be restarted from the beginning. |
BASE ships with one importer and one exporter that allows you to import and export plug-in configurations. This makes it easy to copy configurations between servers. The BASE website also has a page where you can download additional configurations not included in the main distribution.
Both the import and the export is started from the plug-in configuration list view: → →
The importer supports auto detection. Simply upload and select the XML file with the configurations. No more parameters are needed.
If you don't want to import all configurations that exist in the XML-file, there is an option that lets you select each configuration individually. When the option to import all configurations is set to FALSE in the first step of job-configuration, the following step after pressing will be to select those configurations that should be imported, otherwise this step is skipped.
To use the exporter you must first select the configurations that should be exported in the list. Then, enter a path and file name if you wish to leave the XML file on the BASE server or leave it empty to download it immediately.
|
Note |
|---|---|
| The import and export only supports simple values, such as strings, numbers, etc. It does not support configuration values that reference other items. If the plug-in has such values they must be fixed manually after the import. |
The Test with file function is a very useful function for specifying import file formats. It is supported by many of the import plug-ins that read data from a simple text file. This includes the raw data importer, the reporter importer, plate reporter, etc.
|
Note |
|---|---|
| The Test with file function can only be used with simple (tab- or comma-separated) text files. It does not work with XML files or binary files. The text file may have headers in the beginning. |
As you can see in figure Figure 22.7, “The plug-in configuration wizard” there is a button. This will appear in the file format setup step for all plug-ins that support the test with file function. For detailed technical information about this see Section 26.3, “Import plug-ins” in Chapter 26, Plug-in developer. Clicking on the button opens the following dialog:
The window consists of two parts, the upper part where the file to parse and the parameters used to parse it are entered, and the lower part that displays information about the parsing.
- File to test
-
The path and file name of the file to use for testing. Use the button to select a file from the BASE file system or upload a new file. Click on the button to start parsing. The lower part will update itself with information about the parsed file. The file must follow a few simple rules:
Data must be organised into columns, with one record per line.
Each data column must be separated by some special character or character sequence not occurring in the data, for example a tab or a comma. Data in fixed-size columns cannot be parsed.
Data may optionally be preceded by a data header, for example, the names of the columns.
The data header may optionally be preceded by file headers. A file header is something that can be split into a name-value pair.
The file may contain comments, which are ignored by the parser.
- Lines to parse
The number of lines to parse. The default is 100 and rarely needs to be changed. One reason to increase the number is when the data header line is beyond the default value.
- Character set
The character set used in the file. The default is ISO-8859-1 (same as Latin-1). This list contains all character sets supported by the underlying Java run-time and can be quite long.
- Header regexp
-
A regular expression matching a header line. A header is a key-value pair with information about the data in the file. The regular expression must contain two capturing groups, the first should capture the name and the second the value of the header. For example, the file contains headers like:
"Type=GenePix Results 3"
"DateTime=2006/05/16 13:17:59"
To match this we can use the following regular expression:
"(.*)=(.*)".Use the button to select from a list of common regular expressions.
- Data splitter regexp
A regular expression used to split a data line into columns. For example,
\tto split on tabs. Use button to select from a list of common regular expressions.- Ignore regexp
A regular expression that matches all lines that should be ignored. For example,
\#.*to ignore all lines starting with a #. Use button to select from a list of common regular expressions.- Data header regexp
-
A regular expression that matches the line containing the data header. Usually the data header contains the column names separated with the same separator as the data. For example, the file contains a header like:
"Block"{tab}"Column"{tab}"Row"{tab}"Name"{tab}"ID" ...and so onTo match this we can use the following regular expression:
"Block"\t"Column"\t"Row"\t"Name"\t"ID".*.The easiest way to set this regular is expression is to leave it empty to start with, click on the button. Then, in the File data tab, use the drop-down lists in the Use as column to select the line containing the data header. BASE will automatically generate a regular expression matching the line.
- Date footer regexp
A regular expression that matches the first line of non-data after all data lines. In most cases you can leave this empty.
- Min and max data columns
If you specify values a data line is ignored if the number of columns does not fall within the range. If your data file does not have a data header with column names you can use these settings to find the start of data.
- Remove quotes
If enabled, the parser will remove quotes around data entries.
- File data
-
Press the Parse the file button to start parsing the file. This tab will be updated with the data from the file, organised as a table. For each line the following information is displayed:
Line: The line number in the file
Columns: The number of columns the line could be split into with the data splitter regular expression.
Type: The type of line as detected by the parser. It should be one of the following: Unknown, Header, Data header, Data or Data footer.
Use as: Use the drop-down lists to use a line as either the data header or data footer. BASE will automatically generate a regular expression.
File data: The contents of the file after splitting and, optionally, removal of quotes.
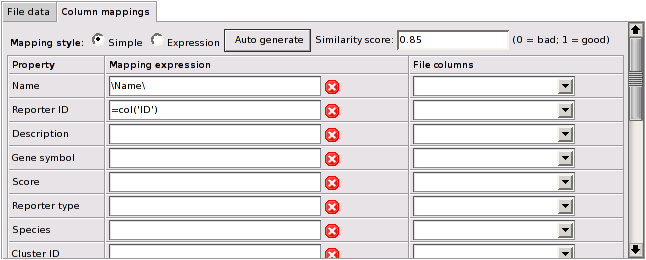
- Column mappings
-
After defining the data header you may need to press the Parse the file button to make this tab visible because this tab is only displayed when data has been found in the file and a data header was recognized. It allows you to easily select the mapping between columns in the file and the properties in the database.
Mapping style: The type of mapping to use when you pick a column from the File columns list boxes.
Property: The database property.
-
Mapping expression: An expression that maps the data in the file columns to the property in the database. There are two types of mappings, simple and expressions. A simple mapping is a string template with placeholders for data from the file. An expression mapping starts with an equal sign and is evaluated dynamically for each line of data. The simple mapping has better performance and we recommend that you use it unless you have to recalculate any of the numerical values. In both cases, if no column matching the placeholder exactly is found the placeholder is interpreted as a regular expression that is matched against each column. The first one found is used. A few mapping examples are listed in Table 22.1, “Mapping expression examples”.
Table 22.1. Mapping expression examples
Expression Explanation \Name\Exact match is required. \1\Column with index 1 (the second column). [\row\, \column\]Combining row and column to a single coordinate. =2 * col('radius')Calculate the diameter dynamically. \F63(3|5) Median\Use regular expression to match either F633 or F635. constant_stringUse constant_stringas value for this column for each line.Note Column numbers are 0-based. We recommend that you use column names at all times if they are present in the file. Auto generate: Click on this button to let BASE try to automatically generate mappings based on fuzzy string matching between the property names and file column headers. Each match get a score between 0 and 1 where 1 indicates a better match. Use the similarity score to limit the automatically generated mappings to matches with at least the given score. A value between 0.7 and 0.9 is usually a good choice.
File columns: Lists of column found in the file. Select a value from this list to let BASE automatically generate a mapping that picks the selected column.
BASE version 1 plug-ins are supported through the use of the Base1PluginExecuter plug-in. Each BASE version 1 plug-in must have at least one Base1PluginExecuter configuration to work. To install a BASE version 1 plug-in follow these instructions:
Install the BASE version plug-in package as outlined in Section 22.1.4, “BASE version 1 plug-ins”
Upload the
*.basefile for the BASE version 1 plug-in. If you cannot find the file, you can let your BASE version 1 server create one for you. In your BASE version 1 installation go to → and use the Export function. This will create a configuration file for your BASE version 1 plug-in that you can upload to your new BASE server.Create a new plug-in configuration using, for example, the button in single-item view for the Base1PluginExecuter plug-in.
Start the configuration wizard and select the
*.basefile describing the BASE version 1 plug-in and enter the path and file name to the location of the executable.To check that the new plug-in works correctly, you need to have an experiment with some data. Go to the single-item view for a bioassay set and click on the button. Select the Base1PluginExecuter plug-in. The list of configurations should include the newly installed plug-in. Select it and click on .
This will enter regular plug-in execution wizard and you will have to enter parameters needed by the plug-in.