Entering annotation values follow the same pattern for all items that can have annotations. They all have a Annotations & parameters tab in their edit view. On this tab you can specify values for all annotation types assigned to the type of item, and all parameters that are attached to the protocol used to create the item. Some items, for example biosources and array designs cannot have a protocol. In their case the tab is labelled Annotations.
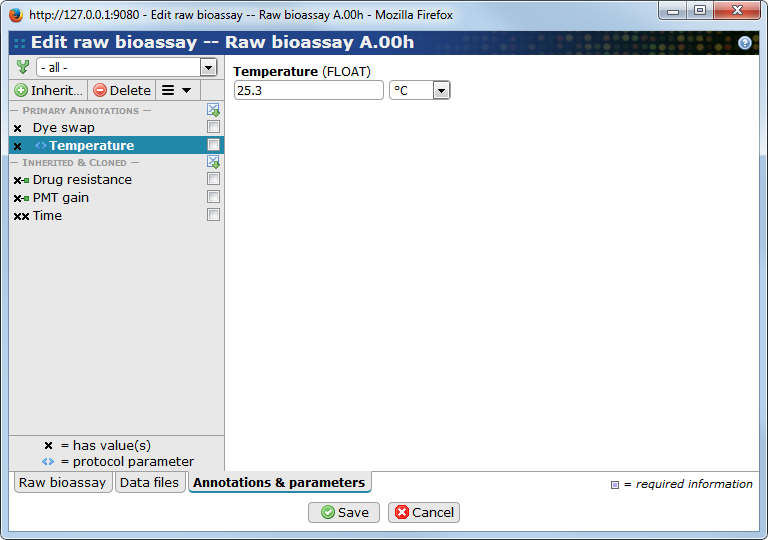
All possible annotation types are listed under the Primary annotations section. Click on an entry in the list to display a form for entering a value for the annotation. Depending on the options set on the annotation type the form may be a simple free text field, a list of checkboxes or radiobuttons, or something else.
Annotation types with an x in front of their names already have a value.
Annotation types marked with angle brackets
( )
are protocol parameters.
)
are protocol parameters.
Select an option in the Categories list to filter the annotation types based on the categories they belong to. This list contains all available categories, and three special ones:
-
all: Display all annotation types
-
protocol parameters: Display only those annotation types that are parameters to the current protocol.
-
uncategorized: Display only annotation types that has not been put into a category.
An annotation for an annotation type that has the Projects annotations feature enabled can be edited more or less in the same way as any other annotation. If an item is edited when no project is active only the default value is accessible. It can be created, modified and deleted just as any other annotation, but note that deleting the default value will not delete any existing project-specific values.
If an item is edited when a project is active, and it doesn't yet have a project-specific value, the default value is visible. If the value is modified, a project-specific annotation is automatically created (the default value is never modified when a project is active). The project-specific value may be deleted to bring back the default value again. Note that changing the project-specific value back to the original value (=same as the default) will not remove the project-specific value.
An item may inherit annotations from any of it's parent items. E.g. an extract can inherit annotations from the sample or biosource it was created from. This is an important feature to make the experimental factors work. Annotations that should be used as experimental factors must be inherited to the root raw bioassay level. See Section 18.3.2, “Experimental factors” for more information about experimental factors. Click on the button to open a dialog for inheriting annotations.
Annotations can either be inherited by reference (the default) or as a cloned value. Inheriting by reference means that if you change the value of the source annotation the new value is automatically picked up by all items inheriting it. A cloned annotation is a copy of the original annotation and it is not automatically updated if the original annotation is modified.
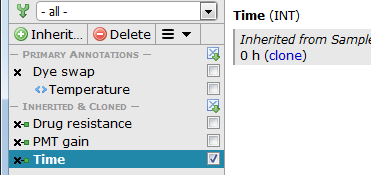
Inherited and cloned annotations are listed under the Inherited & cloned
section. Inherited annotations are marked with  and are always a references back to the original
value. Cloned annotations are marked with a double xx. Cloned annotations
that are out-of-sync with their source annotations are marked with
and are always a references back to the original
value. Cloned annotations are marked with a double xx. Cloned annotations
that are out-of-sync with their source annotations are marked with  .
.
- Inherit...
-
Opens the Inherit annotations dialog (see below).
- Delete
-
Will remove values from the checked primary annotations and delete links to inherited and cloned annotations.
- Sync, Clone, Unclone
-
Convert between INHERITED and CLONED annotation and synchronizes cloned annotations with their source annotation in case the values have changed.
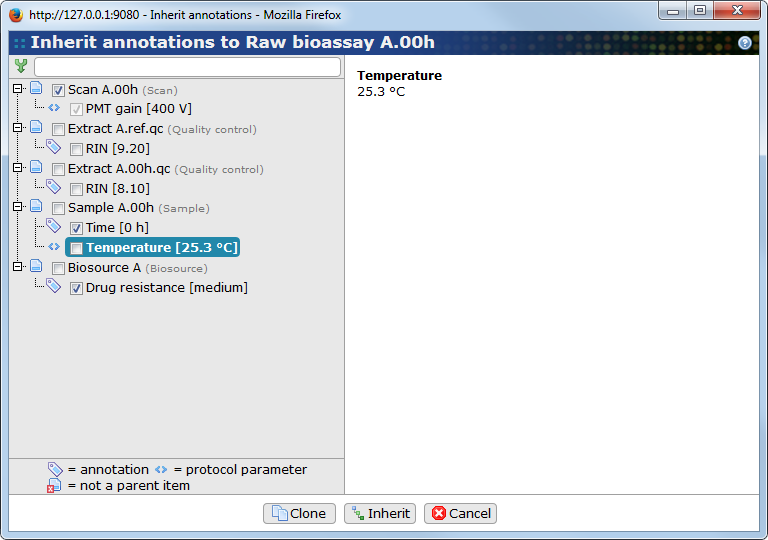
In this dialog there is a tree-like structure in two levels to the left. The first level lists all parent items which has at least one annotation. The second level lists the annotations and protocol parameters for the item. Selecting an item in the first level will inherit all annotations from that item. Selecting an annotation or protocol parameter at the second level will inherit only the selected one.
The filter field on the top of the dialog is a simple search filter to make it easier to find a specific annotation. In large projects, the parent tree may contain lots of items having hundreds of different annotations. Use the filter to find annotations containing the same text. The search is case-insensitive and will match anywhere on the name of the annotation type, but not values. The filter only affects what is displayed. Changes that have been made to hidden items are still saved.
Use the button to inherit the selected annotations by reference, and the button to clone the values of the selected annotations.
![[Note]](../../gfx/admonitions/note.png) |
Note |
|---|---|
|
![[Warning]](../../gfx/admonitions/warning.png) |
Warning |
|---|---|
|
If you rearrange links to parent items after you have specified inheritance, it may happen that you are inheriting annotation from non-parent items. This will be flagged with a warning icon in the list, and must be fixed manually. The item overview tool is an excellent help for locating this kind of problems. See Section 5.6, “Item overview”. |
Manually inheriting annotations on a per-item basis will quickly become a time-consuming and boring task as the project gets larger. Typically, there is a given set of annotations that should be inherited from different levels in the parent chain. This is possible with the batch inherit feature. Open this dialog by selecting at least one item in the list-view and then use the button in the toolbar.
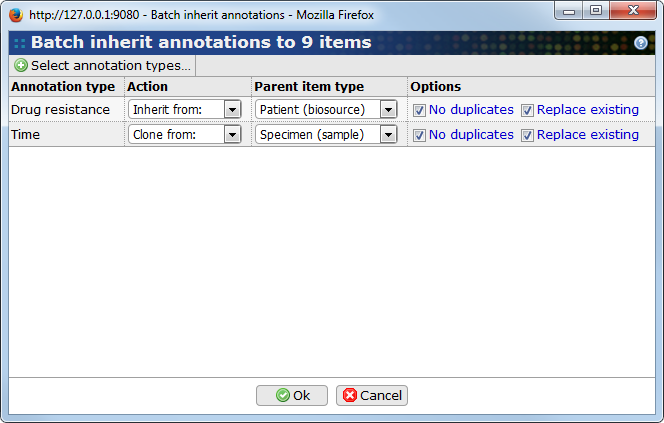
- Select annotation types
-
Use this button to select one or more annotation types that you want to inherit. Once the selection has been made, the selected annotation types will be added to the table in the dialog as shown on the screen shot.
- Action
-
For each annotation type you can select if you want to inherit or clone new annotations, remove existing inherited annotations or resync existing cloned annotation. It is possible to use different actions for different annotation types.
- Parent item type
-
In this list you can select if you want to inherit from any type of parent or only from a specific type. This is useful if the same annotation is present on multiple parent levels. If the annotation type has been added to a category, BASE will automatically try to guess the parent type (=the parent type that has the same name as the category). This option is disabled when removing annotations.
- Options
-
You may specify if existing inherited annotations should be replaced and if duplicate inheritance should be allowed or not. The default is to replace existing annotations and not allow duplicates.
Click on to finish. The work is performed as a background job on the server. The progress can be followed in the dialog. It may take a while to complete if several items was selected since BASE will need to look up all parents and determine if they have any annotations that match the critera that was set up.
BASE includes a plug-in for importing annotations to multiple items in one go. The plug-in read annotation values from a simple column-based text file. Usually, a tab is used as the delimiter between columns, but this is configurable. The first row should contain the column headers. One column should contain a value that can be used to identify items. Typically, the name or the external ID is used, but it is also possible to use the internal ID or an annotation type that has been flagged as an identifier. The rest of the columns can each be mapped to an annotation type and contains the annotation values. If a column header exactly match the name of an annotation type, the plug-in will automatically create the mapping, otherwise you must do it manually. You don't have to map all columns if you don't want to.
Each column can only contain a single annotation value for each row. If you have annotation types that accept multiple values you can map two or more columns to the same annotation type, or you can add an extra row only giving the name and the extra annotation value. Here is a simple example of a valid file with comma as column separator:
# 'Time' and 'Age' are integer types
# 'Subtype' is a string enumeration
# 'Comment' is a text type that accept multiple values
Name,Time (hours),Age (years),Subtype,Comment
Sample #1,0,0,alfa,Very good
Sample #2,24,0,beta,Not so bad
Sample #2,,,,Yet another comment
The plug-in can be used with or without a configuration. The configuration keeps the regular expressions and other settings used to parse the file. If you often import annotations from the same file format, we recommend that you use a configuration. The mapping from file columns to annotation types is not part of the configuration, it must be done each time the plug-in is used.
The plug-in can be used from the list view of all annotatable items. Using the plug-in is a three-step wizard:
-
Select a file to import from and the regular expressions and other settings used to parse the file. In this step you also select the column that contains the name or external ID the items. If a configuration is used all settings on this page, except the file to import from, already has values.
-
The plug-in will start parsing the file until it finds the column headers. You are asked to select an annotation type for each column.
-
Set error handling options and some other import options.