With the Item overview function you can get an overview of all bioassays, extracts, samples, annotations, raw data sets, etc. that are related to a given item. In the overview you can also validate the data to find possibly missing or incorrect information.
You can access the overview for an item by navigating to the single-item view of the item you are interested in. Then, switch to the Overview tab that is present on that page. Here is an example of what is displayed:
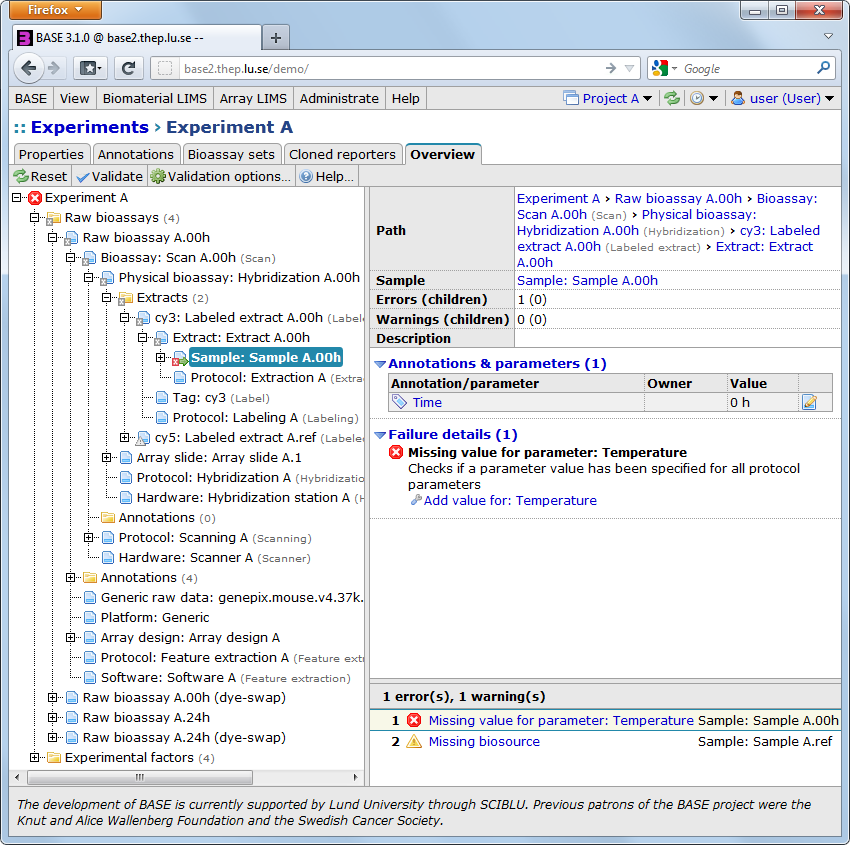
The page is divided into three sections:
-
To the left is a tree displaying items that are related to the current item. The tree is loaded gradually when you click your way through the sublevels. The only exception is after a validation has been done, in this case the whole tree is loaded through the validation-process.
-
The lower right shows a list of warnings and error messages that was found when validating the data. This section is empty if no validation has been done. Click on the button to validate the data and load errors and warnings. In the example you can see that we have failed to specify a value for the Temperature protocol parameter for one of the samples.
-
The upper right shows information about the currently selected item in the tree. This part will also contain more information about errors or warnings for this item, but only if a validation has been done. It may also present you with one or more suggestions about how to fix the problem and with a link that takes you to the most probable location where you can fix the error or warning.
Click on the button in the toolbar to open the Validation options dialog.

The validation procedure is highly configurable and you can select what you want to ignore, and what should be displayed as an error or warning.
- Presets
-
The list contains predefined and user defined validation options. Use the button to save the current options as a user defined preset. The button is used to remove the currently selected preset. Predefined presets cannot be deleted.
- Project defaults
-
The options in this section are used to check if your experiment uses the same values as set by the project default values of the currently active project (see Section 6.2, “Projects”). If no project is active these options are ignored. The validation is only performed if the project has at least one item with a matching type. For example, if no default array design has been added to the project, all array designs are allowed. For items that can have a subtype, the subtype is also considered. For example, if only a default sampling protocol has been selected, no warnings are generated for extraction protocols.
- Missing items
-
The options in this section are used to check if you have specified values for optional items. For example, there is an option that warns you if you have not specified a protocol. For items that can have a subtype, the rule here is to use the information about related subtypes before reporting a missing item. For example, the labeled extract subtype is related to the label subtype and if a label is missing it is reported as a warning. If there is no related subtype no warning is generated.
- Subtypes
-
The options in this section are used to check that related items have a subtype that matches the subtype of the main item. For example, if we have an extract which is a labeled extract subtype the subtype for the related tag should be label, but if the extract is a library the subtype of the tag should be barcode.
- Annotations
-
The options in this section are used to check problems related to annotations. The most important ones are listed here:
- Missing MIAME annotation value: Checks that you have specified values for all annotations marked as Required for MIAME.
- Missing factor value: Checks that you have specified values for all annotations used as experimental factors in the experiment. This is only checked when an experiment is selected as the root item.
- Missing parameter value: Checks that you have specified values for all protocol parameters.
- Annotation is protocol parameter: Checks if an item has been annotated with a an annotation that is actually a protocol parameter.
- Annotation has invalid value: Checks if annotation values are correct with respect to the rules given by the annotation type. This might include numeric values that are outside the valid range, or values not in the list of allows values for an enumerated annotation type.
- Inheriting annotation from non-parent: Checks if inherited annotations really comes from a parent item. This might happen if you rearrange parent-child relationship because you found that they were incorrectly linked.
- Files
-
The options in this section are related to the validity of data files that can be attached to some items, for example, raw bioassays and array designs. The data files are usually validated immediately when they are used and the result is saved to the database. The options in this dialog can be used to find (or ignore) problems with data files.
- Denied access
-
The options in this section are used to check if you do not have access (read permission) to an item in the experiment hierarchy. If this happens the validation cannot proceed in that branch. This might mask other validation problems.
- Link consistency
-
The options in this section are used to check that links between (multiple) items are consistent with each other. The most important options are:
- Array design mismatch: Checks if the array design specified for a raw bioassay is the same array design specified for the physical bioassay.
- Multiple array designs: Checks if all raw bioassays in an experiment use the same array design or not. This is only checked when the root item is an experiment.
- Circular reference to pooled item: If you have used pooling, checks that no circular references have been created.
- Multiple extracts with same tag+position: Checks if the extracts on a physical bioassay have a unique combination of tag+position. This is usually required to be able to assign measured data correctly downstreams.
- Other
-
This section collects options that does not fit into any of the other sections. The most important options are:
- Non-unique name: Checks if two items of the same type have the same name. It is usually a good idea to have unique names within an experiment if the data is going to be exported and in other circumstances.
Click on the button to use the current settings. The display will automatically refresh itself.
The overview includes a function that allows you to quickly fix most of the problems found during the validation. The easiest way to use the function is:
- Click on an error or warning in the list of failures in the lower right pane. The tree in the left pane and the item overview in the top right pane will automatically be updated to show the exact location of the faulty item.
- The upper right pane should contain a list labeled Failure details with more information about each failure and also one or more suggestions for fixing the problem. For example, a failure due to a missing item should suggest that you add or select an item.
- The suggestions should also have links that takes you to an edit view where you can do the changes.
- After saving the changes you must click on the button to update the interface. If you want, you can fix more than one failure before clicking on the button.
![[Note]](../../gfx/admonitions/note.png) |
Inactive links? |
|---|---|
| If you do not have permission to fix a problem the links will be inactive and you'll have to talk to someone with more powers. |