It is important to understand that the BASE application can be spread on to several computers. The main BASE application is serving HTTP requests, the underlying database engine is providing storage and persistence of data, and job agents can be installed on computers that will serve the BASE installation with computing power and perform analysis and run plug-ins. In a straight forward setup one computer provides all services needed for running BASE. From this starting point it is easy to add computers to shares load from the BASE server by installing job agents on these additional computers.
A job agent is a program running on a computer regularly checking the BASE job queue for jobs awaiting execution. When the job agent finds a job that it is enabled to execute, it loads the plug-in and executes it. Job agents will in this way free up resources on the BASE application server, and thus allow the BASE server to concentrate on serving web pages. Job agents are optional and must be installed and setup separately. However, BASE is prepared for job agent setup and to utilise the agents, but the agent are not required.
A job agent supports many configuration options that are not supported by the internal job queue. For example, you can
-
Specify exactly which plug-ins each job agent should be able to execute.
-
Give some plug-ins higher priority than other plug-ins.
-
Specify which users/groups/projects should be able to use a specific job agent.
-
Override memory settings and more for each plug-in.
-
Execute plug-ins in separate processes. Thus, a misbehaving plug-in cannot bring the main application server down.
-
Add more computers with job agents as needed.
All these options make it possible to create a very flexible setup. For example one job agent can be assigned for importing data only, another job agent can be assigned for running analysis plug-ins for specific project only, and a third may be a catch-all job agent that performs all low-priority jobs.
- Make sure the internal job queue doesn't execute all plug-ins
-
The setting
jobqueue.internal.runallpluginsshould be set tofalsefor the BASE server. This setting is found in the<base-dir>/www/WEB-INF/classes/base.configfile. The changes will not take effect until the application server is restarted. - Enable the job agent user account
-
During installation of BASE a user account is created for the job agent. This account is used by the job agents to log on to BASE. The account is disabled by default and must be enabled. Enable the account and set a password using the BASE web interface. The same password must also be set in the
jobagent.propertiesfile, see item Edit thejobagent.propertiesfile below.
- Create a user account on the database
-
This is the similar to granting database access for the BASE server user in the in the regular BASE installation, cf. BASE (database engine). You must create an account in the database that is allowed to connect from the job agent server. MySQL example:
GRANT ALL ON base2.* TO db_user@job.agent.host IDENTIFIED BY 'db_password';
GRANT ALL ON base2dynamic.* TO db_user@job.agent.host;
Replace
job.agent.hostwith the host name of the server that is going to run the job agent. You should also set password. This password is used in item Edit thebase.configfile below in job agent server setup. You can use the same database user and password as in the regular database setup.
- Download and unpack a regular BASE distribution
-
You must use the same version on the web server and all job agents. You find the downloads at https://base.thep.lu.se/wiki/DownloadPage
- Edit the
base.configfile -
The
<base-dir>/www/WEB-INF/classes/base.configfile must be configured as in regular BASE installation, cf. BASE (configuration), to use the same database as the web server application. The most important settings are-
db.username: The database user you created in item Create a user account on the database above. -
db.password: The password for the user. -
db.url: The connection url to the database. -
userfiles: The path to the directory where user files are located. This directory must be accessible from all job agents, i.e., by nfs or other file system sharing method. -
plugins.dir: The path to the directory where plug-ins are located. This directory must be accessible from all job agents, i.e., by nfs or other file system sharing method.
See the Appendix B, base.config reference for more information about the settings in the
base.configfile. -
- Edit
the
jobagent.propertiesfile -
The
<base-dir>/www/WEB-INF/classes/jobagent.propertiesfile contains settings for the job agent. The most important ones to specify value for are-
agent.password: The password you set for the job agent user account in item Enable the job agent user account above. -
agent.id: An ID that must be unique for each job agent accessing the BASE application. -
agent.remotecontrol: The name or ip address of the web server if you want it to be able to display info about running jobs. The job agent will only allow connections from computers specified in this setting.
The
jobagent.propertiesfile contains many more configuration options. See the Appendix F, jobagent.properties reference for more information. -
- Register the job agent
-
From the
bindirectory, register the job agent with./jobagent.sh register
- Start the job agent
-
From the
bindirectory, start the job agent with./jobagent.sh start &
See the Appendix G, jobagent.sh reference for more information about what you can do with the job agent command line interface.
A job agent will not execute a plug-in unless the administrator has configured the job agent to do so. There are two things that must be done:
-
Share the job agent to the users, groups and project that should be able to use it. If the job agent is not shared, only the owner of job agent is allowed to use it. Use the regular Share functionality to specify which users/groups/projects should be able to use the job agent. You must give them at least
USEpermission. To give all users permission to the job agent share it to theEVERYONEgroup. -
Selecting plug-ins that the job agent should handle. This can be done either from the plug-in pages or from the job agent pages. To register a plug-in with one or more job agents from the plug-in pages, go to the edit view of the plug-in and select the Job agents tab. To do the same from the job agent pages, go to the edit view of the job agent and select the Plugins tab. The registration dialogues are very similar but only the plug-in side of registration is described here. The major difference is that it is not possible to enable/disable the internal job queue for plug-in when using the jobagent side of the registration.
Use this tab to specify which job agents the plug-in is installed and allowed to be executed on.
- Run this plugin on
-
You may select if the internal job queue should execute the plug-in or not.
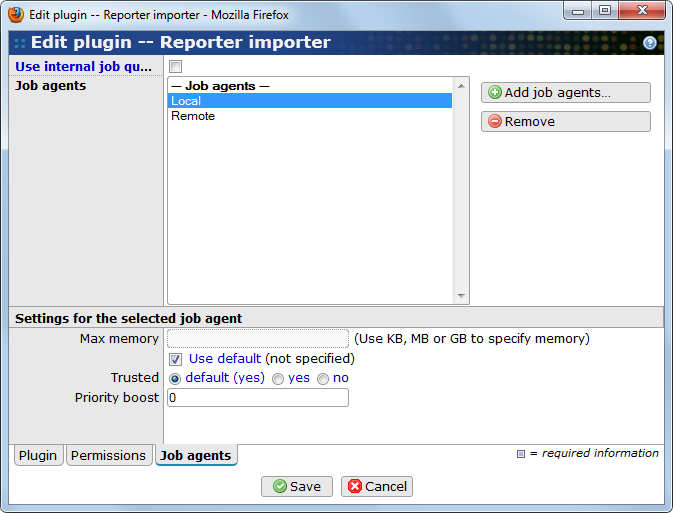
- Job agents
-
A list with the job agents where the plug-in is installed and allowed to be executed. Select a job agent in this list to display more configuration options for the plug-in.
- Add job agents
-
Use this button to open a pop-up window for selecting job agents.
- Remove
-
Remove the selected plug-in from the list.
The following properties are only displayed when a job agent has been selected in the list. Each job agent may have it's own settings of these properties. If you leave the values unspecified the job agent will use the default values specified on the Plugin tab.
- Max memory
-
The maximum amount of memory the plug-in is allowed to use. Add around 40MB for the Java run-time environment and BASE. If not specified Java will choose it's default value which is 64MB.
- Trusted
-
If the plug-in should be executed in a protected or unprotected environment. Currently, BASE only supports running plug-ins in an unprotected environment.
- Priority boost
-
Used to give a plug-in higher priority in the job queue. Values between 0 and 10 are allowed. A higher value will give the plug-in higher priority. The priority boost is useful if we, for example, want to use one server mainly for importing data. By giving all import plugins a priority boost they will be executed before all other jobs, which will have to wait until there are no more waiting imports.