Uploading a file is started by clicking on in the toolbar. The uploaded file will be placed in current directory.
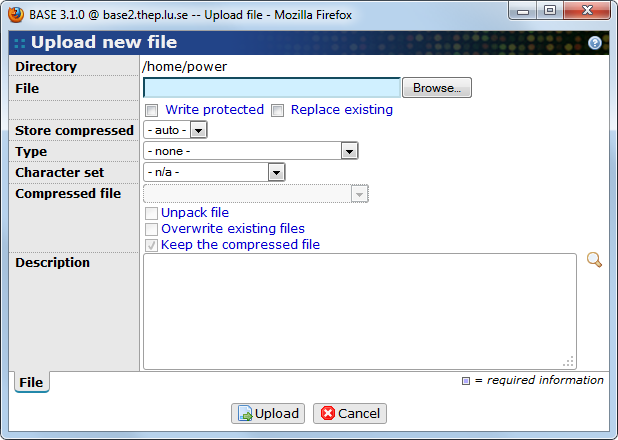
- Directory
-
Shows the current directory, where the file will be uploaded. This property cannot be changed and is only for information.
- File
-
This field is required and needs to have a valid file path for the local computer before the upload is started. Use to choose which file to upload.
- Replace existing
-
Tick this checkbox if you want to overwrite an existing file that has the same name as the one you are going to upload. In contrast with other items, file names must be unique since they are often referenced by name.
- Write protected
-
Mark this checkbox if you want the file to be write protected. A write protected file cannot be deleted, moved offline or replaced with another file. It is still possible to change other metadata, such as the name, description, file type, MIME type, etc.
- Store compressed
-
You can select if you want BASE to store your file in a compressed format or in it's normal format. Compressing the file may save a lot of disk space and it also uses less quota. There are three options:
-
auto: Let BASE automatically decide if the file should be compressed or not. The file is compressed if (1): it is uploaded to a directory that has the compress files flag set or (2): if the matching MIME type has the compress files flag set.
-
yes: Store the file in a compressed format.
-
no: Store the file in it's normal format.
-
- Type
-
This is the file-type that the uploaded file should get. Select
- none -if the file should not be associated with any file type. - Character set
-
If you are uploading a text file, it may be a good idea to select the character set used for the file. The most common character set is UTF-8 or ISO-8859-1. It may be important to get this setting correct if you are going to import data from the file later.
- Description
-
A description about the uploaded file can be put into this text area. Use the magnifying glass to edit the text in a pop-up window with a larger text area.
- Max transfer rate
-
This shows the maximum transfer rate that the upload will approximately reach. The transfer rate is set by the server admin and cannot be changed.
- Compressed file
-
These settings are only active if you select a compressed file format that BASE knows how to unpack. BASE ships with support for some of the most common compressed file formats, such as zip and tar, but this can be extended by the use of plug-ins. See Section 26.6.1, “File unpacker plug-ins” for more information.
-
Unpack file: Mark this checkbox if the compressed file should be unpacked after it had been uploaded. The files will be unpacked with the same sub-directory structure as in the compressed file.
-
Overwrite existing files: Mark this checkbox if the unpacking is allowed to overwrite existing files.
-
Keep the compressed file: Mark this checkbox if you want to keep the compressed file after upload. Otherwise, only the unpacked files are kept.
-
Finish the configuration by clicking on either , which will start uploading the selected file, or to abort the upload procedure.
It is possible to replace an existing file. This is done by clicking on the replace link on the single-item view for the file you want to replace. If the file has been moved offline, you can also use the icon in the actions-column, see number 7 in Figure 7.1, “The file page”. The procedure to upload the file is the same as when uploading a new file, except that compressed files cannot be unpacked. There is also an extra option, Validate MD5, that tells BASE to check that the file is the same as the one it is replacing. This option is useful when you are re-uploading a file that has been moved offline and want to be certain that it is the same file as the original.
![[Note]](../../gfx/admonitions/note.png) |
Note |
|---|---|
| You cannot replace a file which has been marked as write protected. |
Files doesn't have to be stored on the BASE server. It is possible to register an external file by giving the URL to it. In most cases, BASE will be able to use the external file in the same way as a file that has been uploaded to the BASE server. To create an external file reference, use the button.
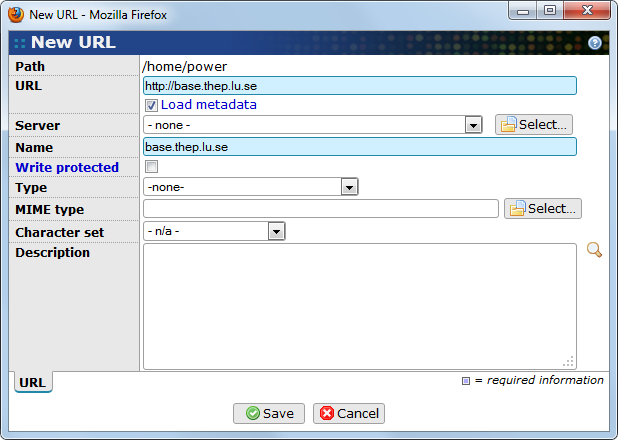
The dialog is more or less the same as the Edit file dialog, but has additional fields for the URL and an optional File server.
- URL
-
The full URL to the referenced file. BASE ships with support http and https URLs, but the administrator may have installed support for other protocols.
- Load metadata
-
Check this box if you want BASE to try to load metadata such as MIME type, size, last modification date etc. for the file. This will also verify that the file actually exists.
- Server
-
Select a file server for this file. This is optional, but is needed to access password-protected files or for some https connections.
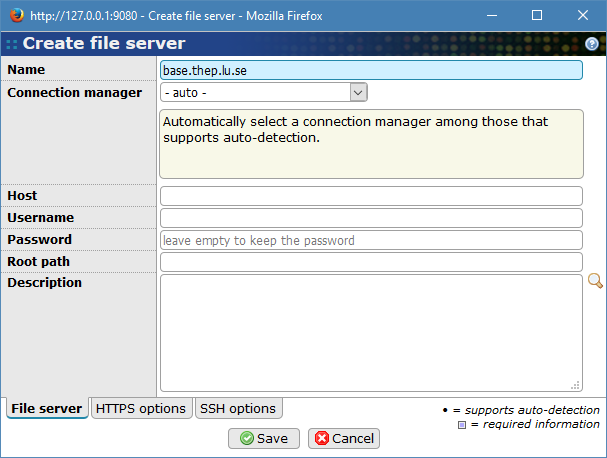
File server are used for external files that are password protected and for files that are using the https protocol and require certificates to connect to the server.
- Name
-
The name of the file server.
- Connection manager
-
The auto setting allows BASE to automatically select a manager based on the file URL. It is possible to force a specific connection manager from this list. The list of available connection managers can be extended by plug-ins. See Section 27.8.8, “Connection managers” for more information.
- Host
-
If specified, overrides the host (and/or port) part of the file URL with the value in this field. This is useful, if for example, a file can be accessed using a "public" path that is entered as the URL for the file and an "internal" path that is used from the BASE server.
- Username/password
-
If the file server requires authorization to access the files you should add a username and password. This will be used by BASE to access the files. Currently, BASE has built-in support for Basic and Digest authentication, but extensions may provide more options.
- Root path
-
An optional absolute path to the directory on the file server that should be accesible. The root path is prepended to the file URL before accessing the file on the server.
- Description
-
Enter a description of the file server.
- HTTPS options
-
On this tab you may specify server and client certificates for HTTPS connections. A server certificate may be needed to access files on servers that use certificates that can't automatically be trusted, for example, a self-signed certificate. The server certificate is uploaded as a file and must be a X.509 certificate in either binary or base64-encoded DER format.
A client certificate may be needed to access files with the HTTPS protocol on servers that require that clients authenticate themselves with a certificate. The certificate is typically issued by the owner of the server and may be password-protected. The client certificate is uploaded as a file and must be in PKCS #12 format.
Use the Remove existing... checkboxes to remove previously uploaded certificates. Leave everything empty to keep things as they are.
- SSH options
-
On this tab you may specify options for SSH connections. BASE has not built-in support for SSH but this can be enabled via plug-ins. See the External files support extension package.
A SSH fingerprint is needed to be able to access a remote server via SSH. If the fingerprint doesn't match access is denied. BASE can store MD5 and SHA-256 fingerprints.
SSH connections typically need a username and password for logging in, but it is also possible to specify a SSH private key. Auto-detection of the key format should work in most cases. If not, it can be manually specified.
Use the Remove existing private key... checkbox to remove a previously uploaded private key.
The edit window to set a file's property in can either be open with that is located in the toolbar at the file's view page or by holding down CTRL, ALT or SHIFT when clicking on the file's name in the list. It requires that the current user has write permission on the file to be able to edit and set the properties.
- Path
-
This is the path where the file is located. This can only be changed by moving the file. Read more about how this is done in Section 7.2.5, “Move files”.
- URL, Server
-
See External files above.
- Name
-
The file's name, which cannot be left empty and must be unique in current directory. The maximum length of the file name is 255 characters and it can contain blank spaces but not any of ~, \, /, :, ;, *, ?, <, > or |.
- Write protected
-
Mark this checkbox if you want the file to be write protected. A write protected file cannot be deleted, moved offline or replaced with another file. It is still possible to change other metadata, such as the name, description, file type, MIME type, etc.
- Type
-
Sets which kind of type the file is. Select the file type to use from the drop down list with available types. The option -none- should be used if the file should not be associated with any kind of file type.
- MIME type
-
The file's content/media type. This is normally set automatically when uploading the file into BASE but it can be changed by an user, that has write permissions, at any time.
- Description
-
This text area can be used to store relevant information about file and it's contents. Use the magnifying glass, located to the right under the text area, to edit the text in a larger window.
Finish the editing process by pressing either to save the properties to the database or to abort and discard the changes.
These functions are used to manage the location of the files on the server. They are all accessed from the button on the list view of from the single-item view. On the list view, you must first select one or more files / directories.
![[Tip]](../../gfx/admonitions/tip.png) |
Write protect your files! |
|---|---|
|
If you mark a file as write protected it will not be possible to delete, move or replace the file. Use this options for important data files that you do not want to loose by accident. |
Files and directories can be moved to other directories for re-organization. The user need write permission on the target directory to be able to move the files/directories to it.
First, select all files and directories in the current path that should be moved and then click on in the toolbar to open a window with the directory tree where the target directory can be picked.
Choose a directory which the selected items should be moved to. It is possible to create new sub-directories with the button.
Click on to carry out the move or to abort.
Moving a file offline means that the actual file contents is deleted from the server's disk space but information about the file will still exist as an item in the database. This makes it possible to save disk space but still be able to associated the file with other items in BASE.
First, select all files in current path that should be moved offline and then click on in the toolbar.
![[Warning]](../../gfx/admonitions/warning.png) |
Warning |
|---|---|
|
Be careful! The selected files will be removed from the server. The only way to recover the contents again is to re-upload the files. |
In Actions column in the list view there are icons you can click on to perform different kinds of actions on a file, like downloading the file and viewing the file. The same icons appear on the single-item view and in most other places where files are used. You cannot view or download files that have been moved offline.
This will let the user to download the contents of a file to a path on a local computer. The window that opens contains the selected file's name, size e.t.c. and it will also open a download dialog window where the user can choose what to do with the file locally.
|
Download does not start |
|---|---|
|
Click on the file's path name in the pop-up window if the download dialog window does not appears. |
Close the pop-up window and return to file page with .
A file's contents can be displayed directly in the web browser if the browser supports displaying that kind of files. Typically all HTML, text files and images are supported. Click on the icon to view the contents in a new window. If the type is not supported by the browser there will be a dialog-window to download the file instead.
You can download multiple files/directories at the same time. First,
from the file browser, select one or more files/directories. Then, click
on the button. Select the Packed file exporter
plug-in and choose one of the file formats below it. On the
page you can specify other options for the download:
-
Save as: The path to a file on the BASE file system where the selected files and directories should be packed. Leave this field empty to download the files to your own computer.
-
Overwrite: If you are saving to the BASE file system you may select if it is allowed to overwrite an existing file or not.
-
Remove files/directories: If you select this option the selected files and directories will be marked as removed. You must still go to the Trashcan and remove the items permanently.
Directories in BASE are folders where files can be organized into. Click on in the toolbar to create a directory in current path and edit the properties as described below.
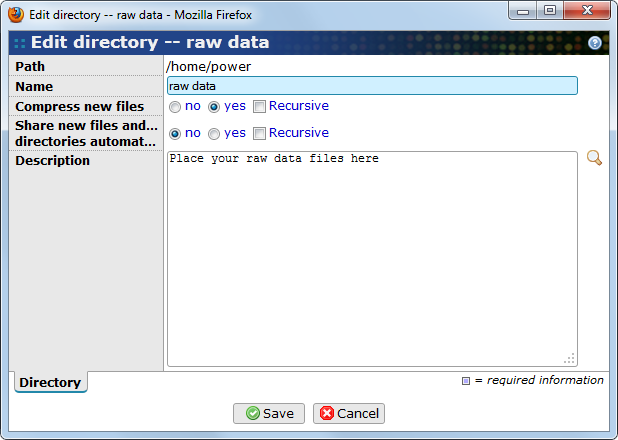
Properties
- Path
-
This property is read-only in the edit window but can be changed by moving the directory, described in Section 7.2.5, “Move files”.
- Name
-
The directory's name to identify it with in the list. This field must have a value and it has to be an unique name for the current directory.
- Compress new files
-
Enable this option to let BASE store files that are uploaded to this directory in a compressed format. This option only affect files that are uploaded later, it doesn't affect already existing files or files that are moved between directories. Check the Recursive button to apply this setting to all subdirectories.
- Share new files and sub-directories automatically
-
Enable this option to let BASE automatically share new files and directories with the same permissions as have been specified on this directory. This option is useful when you have assigned a specific directory as a common area for a group of users and you want to make sure that all users has access to all files. Some restrictions apply:
-
Permissions for the Everyone group are not inherited if the logged in user doesn't have the SHARE_TO_EVERYONE permission.
-
If a project is active the new file/directory will be shared to the active project as well.
Check the Recursive button to apply this setting to all subdirectories.
-
- Description
-
Any relevant information about the directory can be written in this text area. The magnifying glass down to the right can be used to edit the description text in a larger text area, just click on the icon to open it in a separate pop-up window.
The editing process is completed with either , to save the properties into the database, or with to discard the changes. Both of the buttons will close the edit window and if the directory is updated the list will be reloaded with the directory's new properties.
|
Note |
|---|---|
| The new directory does not appear in the navigation tree to the left automatically. You must click on the button. |