With bioplates it is possible to organize biomaterial such as samples and extracts into wells. Each plate has a number of wells that is defined by the plate geometry.
Use to get to the list of bioplates.
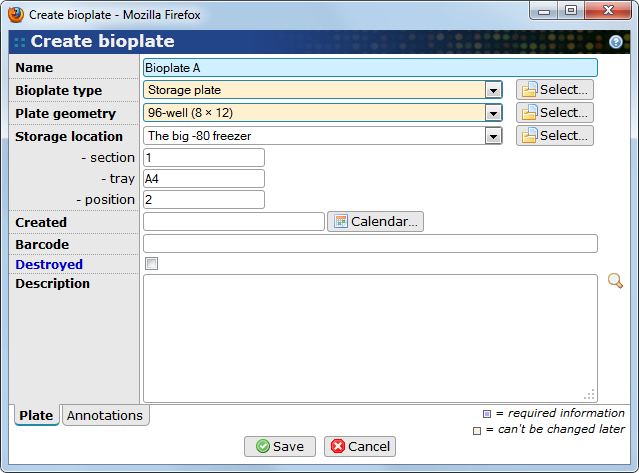
- Name
-
The bioplate name. The name does not have to be unique but it is recommended to keep it unique. BASE by default assigns
New bioplateas name. This field is mandatory. - Bioplate type
-
The type of the bioplate may be a generic storage plate that can store any type of biomaterial or a locked plate that can only store a single type of biomaterial. This field is mandatory and can only be set for new bioplates. See Section 16.5.3, “Bioplate types” for more information.
- Plate geometry
-
Information about the plate design defining the number of rows and columns on the bioplate. This field is mandatory and can only be set for new bioplates.
- Storage location
-
The location, for example a freezer, where the bioplate is stored. Optional.
- Section
-
The section within the freezer where the bioplate is stored. Optional.
- Tray
-
The tray within the section where the bioplate is stored. Optional.
- Position
-
The position within the tray where the bioplate is stored. Optional.
- Barcode
-
Barcode of the bioplate. Optional.
- Description
-
Other useful information about the bioplate. Optional.
The Annotations tab allows BASE users to use annotation types to refine bioplate description. More about annotating items can be read in Section 10.2, “Annotating items”
Biowells existence are managed through the bioplate they belong to. Creating a bioplate will automatically create the biowells (as given by the selected geometry) on the plate. The wells are initially empty. To add biomaterial to the plate go to the single-item view page for the bioplate. This page includes an overview of the layout of the plate. Clicking on an empty well will open a popup dialog that allows you to select a biomaterial. The same dialog can also be accessed from the Wells tab. Assigning a biomaterial to a biowell can also be done when editing a sample or extract, or by using the Place-on-plate wizard.
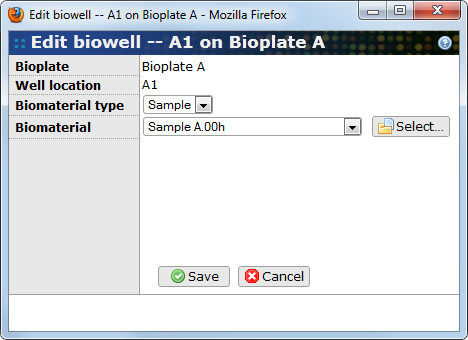
- Bioplate
-
Shows which bioplate the biowell is located on. This property is read-only.
- Well location
-
The biowell location on the bioplate in row+column format. This property is read-only.
- Biomaterial type
-
The type of biomaterial stored in this biowell. This property must be selected before before a biomaterial can be selected. On some plates this is locked due to settings in the bioplate's type.
- Biomaterial
-
Name of the biomaterial in this biowell. Before changing this you must select the appropriate Biomaterial type. A biomaterial can only be placed in a single well. If the selected biomaterial is already placed in another location it will be moved.
Bioplate types are used to subclassify bioplates and may put restrictions on them. BASE ships with a few pre-defined bioplate types. The Storage plate type is a generic plate type that can be used for all types of biomaterial and doesn't have any other restrictions on it. The reaction plate types are locked to a single type of biomaterial and have a restriction that biomaterial can never be moved out from a well once it has been placed there.
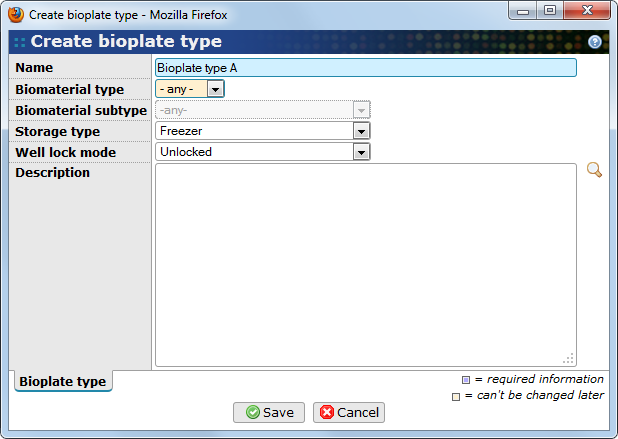
- Name
-
The name of the bioplate type.
- Biomaterial type
-
Select if bioplates using this type should be locked to specific biomaterial type or not. This property can only be set for new bioplate types.
- Biomaterial subtype
-
If a specific biomaterial type has been selected it is also possible to further restrict the use of the bioplate to a certain biomaterial subtype. The restriction is not enforced by the core but is mainly used by the gui to provide smart filters in selection lists, in the bioplate event wizards, etc.
- Storage type
-
The subtype of the hardware item (eg. freezer, cabinet) where bioplates with this bioplate type usually are stored.
- Well lock mode
-
This option controls the wells on bioplates using this type. There are four options:
-
Unlocked: The wells are unlocked and biomaterial can be added and removed freely any number of times.
-
Locked after add+clear: A biomaterial can be placed once in the well and then moved to another bioplate. After that the well becomes locked and it is not possible to add a different biomaterial to it.
-
Locked after add: The wells are locked as soon as biomaterial is added to them. The biomaterial can't be moved to another place or be replaced with other biomaterial.
-
Locked at plate creation: The wells are locked as soon as the bioplate has been saved to the database. This lock mode is primarily intended to be used when plug-ins are creating and populating the bioplate as a single event.
-
- Description
-
Other useful information about the bioplate type. Optional.
Certain actions can be applied collectively to the biomaterial on a bioplate, either as a whole or a subset that is picked by the user. A list of the available actions can be found on the list page . Although it is possible to create more event types here there is usually no meaning to do so, since each event needs a specailized GUI wizard to take care of it. The possibility to add more event types should be seen as an opportunity for extension development.
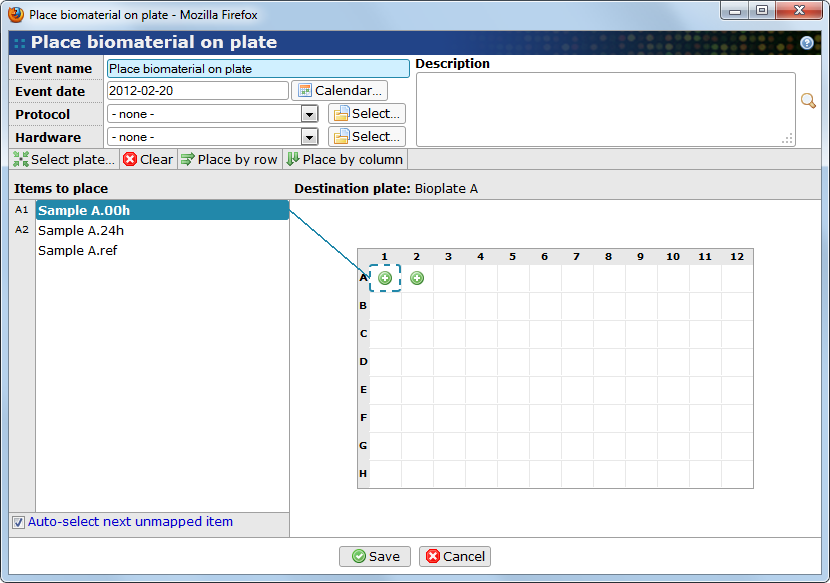
This event is available on the sample and extract list pages and can be used to place multiple biomaterial on a bioplate in one go. Click on the button to start the wizard. The wizard will automatically use the selected biomaterials or, if none are selected, all listed biomaterials that aren't alredy located on a plate.
- Event name
-
Give a name to the event, or keep the suggested name.
- Event date
-
The date of the event.
- Protocol
-
The protocol used in the event, if any.
- Hardware
-
The hardware item used in the event, if any.
- Description
-
Other comments about the event.
- Select plate...
-
You need to select an existing plate on which the biomaterial should be placed. It is only possible to use one plate in each event. If you want to place biomaterial on more than one plate, the wizard must be repeated for each destination plate.
- Clear
-
Clear all current placement.
- Place by row/column
-
Automatically place the remaining biomaterial by filling empty wells, starting with rows or columns.
- Items to place
-
This column contains the biomaterial that should be placed on the plate. When a destination plate has been selected, it is displayed as a grid to the right. To place a biomaterial either use the or buttons, or select an item in this list. When an item has been selected, click on the destination well on the plate. The coordinate of the well is displayed in the gray area before the biomaterial name and a line is drawn between it and the destination well. The destination well is also marked with an icon. If the Auto-select next unmapped item is selected the selection is automatically moved to the next biomaterial which can then be placed by selecting another destination well. If a mistake is made it is easy to correct. Simply re-select the item and then click on the correct well.
When the biomaterial has been placed on the plate (it is not neccessary to place all of them) click on to store everything. BASE will create a plate event for the selected destination plate and "other"-type events for each biomaterial that was placed on it.
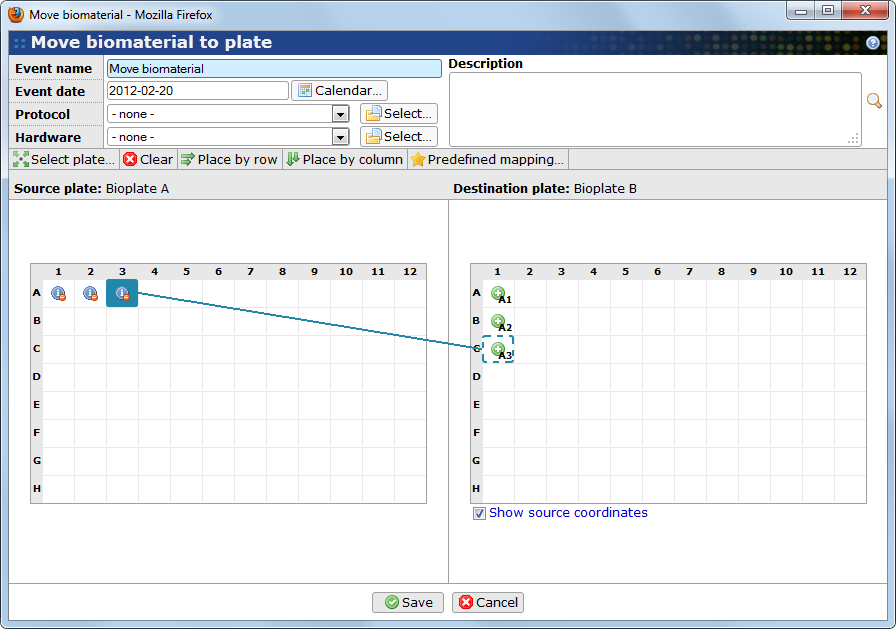
This event is available on the single-item view page of a bioplate and can be used to move biomaterial from one plate to another. Click on the button to start the wizard.
- Event name
-
Give a name to the event, or keep the suggested name.
- Event date
-
The date of the event.
- Protocol
-
The protocol used in the event, if any.
- Hardware
-
The hardware item used in the event, if any.
- Description
-
Other comments about the event.
- Select plate...
-
You need to select an existing plate to which the biomaterial should be moved. It is only possible to use one plate in each event. If you want to move biomaterial to more than one plate, the wizard must be repeated for each destination plate.
- Clear
-
Clear all current mapping between the source and destination plates.
- Place by row/column
-
Automatically move the remaining biomaterial by filling empty wells, starting with rows or columns.
- Predefined mapping
-
Use this button to select a predefined mapping between source and destination wells. The biomaterial will be moved according to the mapping.
- Source plate
-
This displays the source plate as a grid with icons that indicate filled and movable wells. When a destination plate has been selected, it is displayed as a similar grid to the right. To move a biomaterial either use the , or buttons, or select a well on the source plate. When a source well has been selected, click on a well on the destination plate. A line is drawn between the source and destination wells and the icons are updated to show what is going on. The wells on the destination plate will also show the coordinate of the mapped source well unless the Show source coordinates checkbox is deselected. If a mistake is made it is easy to correct. Simply re-select the source well and then click on the correct destination well.
When the biomaterial has been mapped between the source and destination plates (it is not neccessary to map all of them) click on to store everything. BASE will create a plate event for the selected plates and "other"-type events for each biomaterial that was moved.

This event is available on the single-item view page of a bioplate when the bioplate is limited to a single type of biomaterial (eg. only samples or only extracts). The event is used to create either a child bioplate with biomaterial that is derived from the biomaterial on the parent plate or to create one or more physical bioassays. Click on the button to start the wizard.
The wizard has two steps. In the first step you set properties that are related to the event and to the creation of child plates and biomaterial. The first step is divied into three main sections.
Event
- Event name
-
Give a name to the event, or keep the suggested name.
- Event date
-
The date of the event.
- Protocol
-
The protocol used in the event, if any.
- Hardware
-
The hardware item used in the event, if any.
- Description
-
Other comments about the event.
Child biomaterial
- Type
-
The type of child items to create. If the source plate contains samples, you can select between sample and extract and if the source plate contains extract you can select between extract and physical bioassay.
- Subtype
-
The subtype to assign to the newly created biomaterial (or physical bioassay). The list of options is automatically updated based on the selection in the Type list.
- Tag
-
Visible when creating child extracts only. Select the tag to assign to the new extract. If no tag is selected and the source biomaterial is also extracts, the children will get the same tag as their parents.
- Original quantity
-
The original quantity of the new biomaterial. Not visible when creating a physical bioassay.
- Used quantity
-
The quantity that was used from the parent biomaterial in the process of creating child biomaterial.
- Description
-
Other comments about the new biomaterial.
Child plates
- No. of plates
-
The number of child plates to create. The default value is 1.
- Name prefix
-
The child plates will be named using the prefix plus a running number starting with 0. Eg. New plate.0.
- Geometry
-
The geometry of the child plates. The default is the same geometry as the parent plate. This option is replaced with Size of bioassay when creating a physical bioassay.
- Plate type
-
The plate type of the child plates. Not used when creating a physical bioassay.
- Freezer
-
The freezer in which the new child plates are located. Not used when creating a physical bioassay.
- Description
-
Other comments about the new child plates.
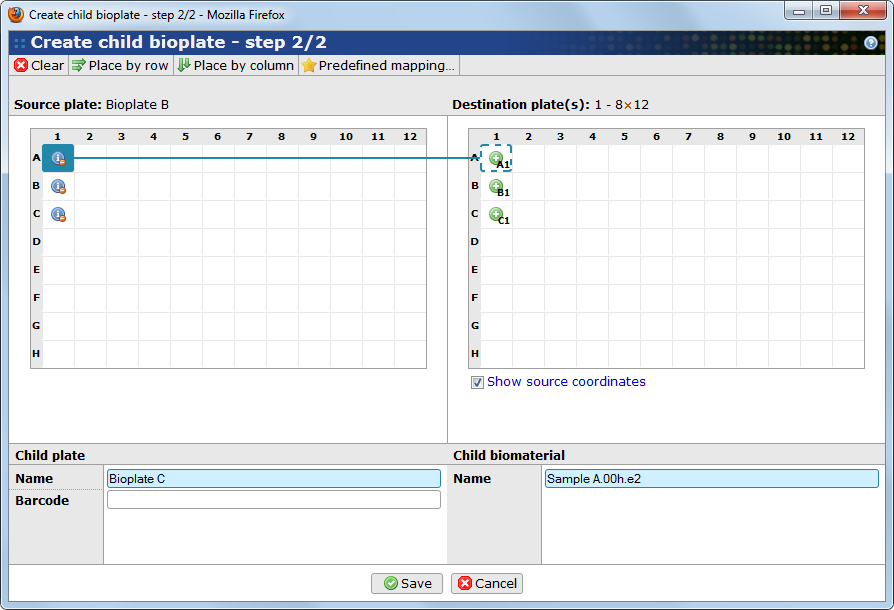
The second step display the source plate and new child plates as a grid. To create child biomaterial either use the , or buttons, or select a well on the source plate. When a source well has been selected, click on a well on the destination plate. A line is drawn between the source and destination wells and the icons are updated to show what is going on. The wells on the destination plate will also show the coordinate of the mapped source well unless the Show source coordinates checkbox is deselected. If a mistake is made it is easy to correct. Simply re-select the source well and then click on the correct destination well.
When a child biomaterial is selected you have the option to override the automatially generated name. It is also possible to change the name and barcode of the child plate.
![[Note]](../../gfx/admonitions/note.png) |
Note |
|---|---|
| The principle is the same when creating physical bioassays, except that no new child biomaterial is created. |
When the biomaterial has been mapped between the source and destination plates (it is not neccessary to map all of them) click on to store everything. BASE will create a plate event for the selected plates and "create" or "bioassay"-type events for each biomaterial that was used.