Table of Contents
Item lists are used for grouping items that are somehow related (or not) into a single entity. Some typical use cases are to keep track of biomaterial that is going to be processed in the lab or to find raw data sets that are suitable to use in an experiment.
A list may only contain members of a single type. The list below show the item types that are currently supported. Support for other item types may be added in the future.
- Biosource
- Sample
- Extract
- Physical bioassay
- Derived bioassay
- Raw bioassay
List membership is typically managed either manually, or with the help of synchronization filters.
To begin working with item lists go to the . Click on to create a new item list.
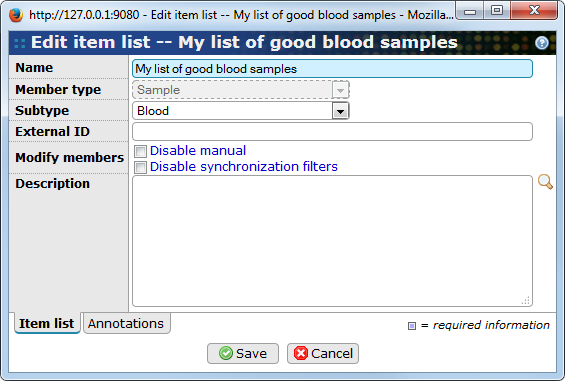
- Name
-
The name of the item list.
- Member type
-
The type of the list member items. This must be set when the list is created and can't be changed later.
- Subtype (or Raw data type)
-
The suptype of items that are expected to be found in the list. This is not enforced but should only be considered as a hint to developers for creating a better user experince. For example, prefilling filters when selecting items. For item lists containing raw bioassays a raw data type can be selected instead of a subtype.
- External ID
-
An external reference that may or may not be unique. Not used by BASE.
- Modify members
-
If the Disable manual checkbox is selected, members can't be manually added to or removed from the list. This also includes using the merge functionality for creating unions, intersections, etc.
If the Disable synchronization filters checkbox is marked, members can't be modified by synhronization filters. If both options are marked the list is effectively locked for modifications.
- Description
-
A description of the item list.
Click on to save the item list.
![[Note]](../gfx/admonitions/note.png) |
Creating an item list from other list pages |
|---|---|
|
It is also possible to create a new item list directly from several other list pages. For example, from the samples list page. Click on the button. In this case, the popup dialog has an extra option:
|
To manually manage the members go to the Members tab on the single-item view page for the item list. Use the button to start adding members. This will open a regular list view in a popup window. The only difference is that there are extra buttons at the bottom of the page.
- Add selected
-
This button will add all selected items in the popup to the item list.
- Add current page
-
This button will add all items that are displayed on the current page to the item list.
- Add all
-
This button will add all items that are matching the current filter to the item list. If there is no filter on the table, all items will be added to the item list.
- Close
-
Closes the popup without adding any members to the item list.
Back on the members page for the item list, the new members should now appear in the table. To remove members use the button. This button will only remove members that has been selected.
![[Tip]](../gfx/admonitions/tip.png) |
Use batch importers to add and remove members |
|---|---|
|
The batch importer plug-ins have support for adding and removing members. Simply start the importer from the button and select add-members or remove-members for the Mode parameter. The importers can also be used for updating member items. |
From the Properties tab it is possible to access the merge functions that can be used to add and/or remove members with the help of other item lists. There are three basic operations that all open the same popup dialog, but with different options pre-selected.
-
For creating a list that is a union of the members in several other lists.
-
For creating a list that is the intersection of members of this list and several other list.
-
For removing members from this list that are not members in other lists.
In the popup dialog it is possible to create other combinations as well. They are all illustrated with a figure to make it easier to understand what the final result is going to be.
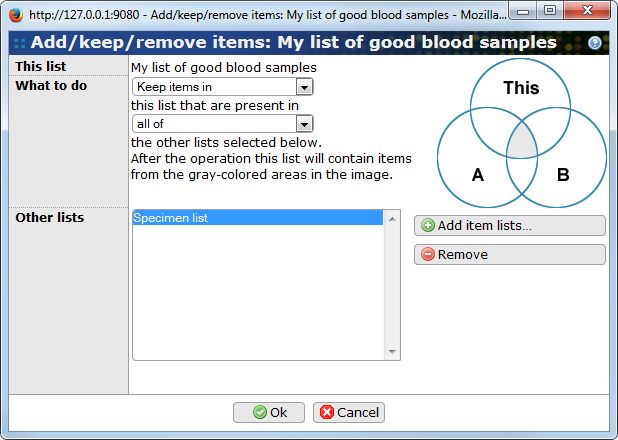
- What to do
-
There are two selection lists that are used to describe how the selected item lists should be merged. The illustration to the right is automatically updated to give a schematic overview of the effects of the current selection. The first selection list have three options.
The Add items option will only add members to this list. This creates a union-like merge operation.
The Keep items option will remove members from this list depending on if they are members of the other lists or not. This creates an intersection-like merge operation.
The Remove item option also remove members from this list depending of if they are members of the other lists or not. This creates a complement-like merge operation.
- Other lists
-
Before the merge operation can take place, you must select at least one other item list containing members of the same type as this item list.
Click on to perform the merge.
Synchronization filters are a powerful way of keeping an item list synchronized with a predefined set of filter conditions. It is possible to apply filters on any level in the parent/child chain going from biosource to physical bioassays to raw bioassays. For example:
-
Start by creating an empty item list that should contain samples with subtype Blood.
-
Then add a filter that says that the parent biosource, which is of subtype Patient, must have an annotation Consent = Yes. This should make sure that you only work with samples that you know you have permission to use.
-
Add another filter that says that a child extract, which is of subtype RNA, must have an annotation Quality > 8. This should make sure that you only work with samples that you know are of good quality.
-
Finally, add a filter that says that a child raw bioassay must have an annotation Aligned > 10,000,000. This should make sure that you only work with samples that you have good sequencing data from.
To create a synchronization filter use the button on the item list view page.
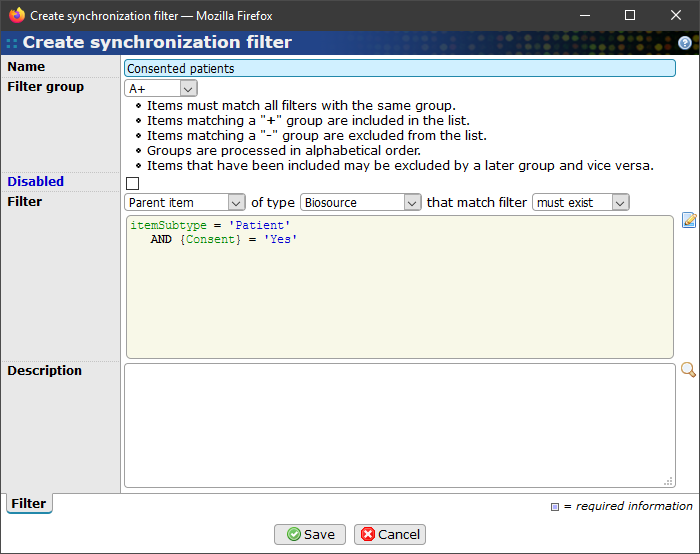
- Name
-
Give the filter a descriptive name to make it easier to know what it does.
- Filter group
-
Synchronization filters in a list can be grouped into subgroups and this affects how items are combined into the final list. Filters in the same group are evaluated together and items must match all of them. Items matching a "+" group are included in the list. Items matching a "-" group are excluded from the list. The groups are processed in alphabetical order.
- Disabled
-
A disabled filter is not used when synchronizing the list members. This feature is useful when searching for problems.
- Filter
-
This section defines the filter. In the first row you must select if the filter should be used for finding items on the same level as the members in the list or for finding Parent items or Child items. Note that some options may be missing if the item list should contain members that are already at the top or bottom of the parent/child chain.
If the parent or child item option is selected from the first list, a second list allows you to specify the type of the parent or child item. This list should only contain item types that are relevant as seen from the starting point. For example, if the item list contain samples the only types of parent items are other samples or biosources.
The last option allows you specify if a parent or child must exist or if it must not exist. The latter option is usful when searching for samples that has failed in some step in the processing (so that no child item has been registered).
The actual filter is displayed below the selection list. It is typically empty to begin with. Use the icon to the right to open a popup dialog containing a list view listing the items that you want to filter on. Manipulate this list view by adding filters and then click on when you are done. The current list filter is saved to the synchronization filter and is displayed in the dialog.
- Description
-
You may want to add a more detailed description of what the filter does.
Click on to save the filter. The view page should automatically be updated and will most likely display a warning that the list is out of sync. You can ignore this warning and add more synchronization filters.
When all filters has been created click on the button to start the synchronization process.
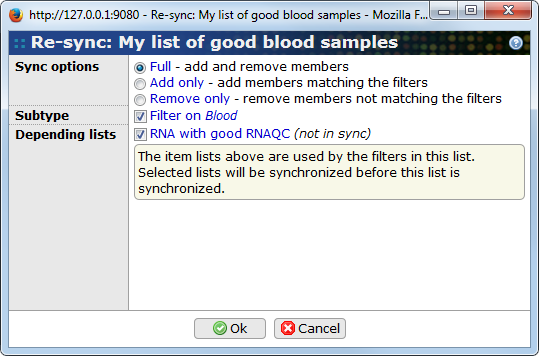
- Sync options
-
The Full option will both add members to and remove members from the list so that all items are matching the current filters.
The Add only option will only add members to the list. The new members are those matching the current filters that are not already in the list. Existing members that doesn't match the filters are not removed.
The Remove only option will only remove members from the list. The removed members are those that no longer match the filters. New items that are found to match the filters are not added to the list.
- Subtype (or Raw data type)
-
This option is only enabled if a subtype or raw data type has been selected for the list. It adds an extra "virtual" synchronization filter that only matches items of the specified type.
- Depending lists
-
If the synchronization filters for this list uses other items lists which are also using syncronization filters those lists are shown here. A quick check is made for each list to see if it appears to be in sync or not. The selected lists are synchronized before the current item list is synchronized.
Click on to start the synchronization process. It is started in the background and a progress bar will show the ongoing progress. Note that closing the progress window will not abort the synchronization.