 Development information
How to write plug-ins
Development information
How to write plug-ins
These instructions currently cover how to create plug-ins with the Java programming language for use in BASE 2.
Contents
See also
The Base2 core defined two interfaces that are vital for implementing plugins:
net.sf.basedb.core.plugin.Plugin
net.sf.basedb.core.plugin.InteractivePlugin
Plugin interface is implemented, but the
InteractivePlugin is optional, and is only needed if you want user
interaction.
Plugin interfaceThis interface defines five methods and must be implemented by all plugins:
Return information about the plugin, i.e., the name, version, and a short description
about what the plugin does. The About object also has fields for
naming the author and various other contact information. The returned information
is copied by the core at installation time into the database. The only required information
is the name of the plugin. All other fields may have null values.
A typical implementation stores this information in a static field:
private static final About about =
   new AboutImpl
   (
      "Spot images creator",
      "Converts a full-size scanned image into smaller preview jpg " +
      "images for each individual spot.",
      "2.0",
      "2006, Department of Theoretical Physics, Lund University",
      null,
      "base@thep.lu.se",
      "https://base.thep.lu.se"
   );

public About getAbout()
{
   return about;
}
Return information about the main type of plugin. The MainType
is an enumeration which defines five possible values:
ANALYZE: An analysis plugin
EXPORT: A plugin the exports data
IMPORT: A plugin that imports data
INTENSITY: A plugin that calculates the original spot intensities
from raw data
OTHER: Any other type of plugin
The returned value is stored in the database but is otherwise
not used by the core. Client applications (such as the web client)
will probably use this information to group the plugins, i.e., a button
labeled Export will let you select among the export plugins.
A typical implementation just return one of the values:
public Plugin.MainType getMainType()
{
   return Plugin.MainType.OTHER;
}
If this method returns true the plugin can have
different configurations, (ie. PluginConfiguration).
Note that this method may return true even if the
InteractivePlugin interface isn't implemented. The
AbstractPlugin returns true for this method
which is the old way before the introduction of this method.
If this method returns true a Job can't be
created without a configuration. The AbstractPlugin returns
false for this method which is the old way before the
introduction of this method.
Prepare the plugin for execution (or configuration). If the plugin needs to do some initialization this is the place to do it. A typical implementation however only stores the passed parameters in instance variables for later use.
The parameters passed to this method has vital information that is needed
to execute the plugin. The SessionControl is a central core
object which holds information about the logged in user and allows you
to create DbControl objects which allows a plugin to connect
to the database to read, add or update information. The two
ParameterValues objects contains information about the parameters
to the plugin. The configuration object holds all parameters
stored together with a PluginConfiguration object in the database.
The job object holds all parameters that are stored together with a
Job object in the database.
The difference between a plugin configuration and a job parameter is that a configuration is usually something an administrator sets up, while a job is an actual execution of a plugin. For example a configuration for an import plugin holds the regular expressions needed to parse a text file and find the headers, sections and data lines, while the job holds the file to parse.
The AbstractPlugin contains an implementation of this method
make the passed parameters available as protected
instance variables. We recommend plugin developers to let their plugins
extend this class since it also has some other useful methods. For example
for validating parameters resulting from user interaction and to store these
values in the database.
The AbstractPlugin implementation of this method.
protected SessionControl sc = null;
protected ParameterValues configuration = null;
protected ParameterValues job = null;
/**
   Store copies of the session control, plugin and job configuration. These
   are available to subclasses in the {@link #sc}, {@link #configuration}
   and {@link #job} variables. If a subclass overrides this method it is
   recommended that it also calls super.init(sc, configuration, job).
*/
public void init(SessionControl sc,
   ParameterValues configuration, ParameterValues job)
   throws BaseException
{
   this.sc = sc;
   this.configuration = configuration;
   this.job = job;
}
Runs the plugin. The Request parameter has no useful information
and can be ignored. It was originally used for passing parameters to the plugin
but this is now found in the two ParameterValues objects passed
to the init method.
The ProgressReporter can be used by a plugin to report it's progress
back to the core. The core will usually send the progress information to the database,
which allows users to see exactly how the plugin is progressing from the web
interface. This parameter can be null, but if it isn't we recommend all plugins
to use it. However, it should be used sparingly, since each call to set the progress
results in a database update. If the execution involves several thousands of items
it is a bad idea to update the progress after processing each one of them. A good starting
point is to divide the work into 100 pieces each representing 1% of the work, i.e.,
if the plugin should export 100 000 items it should report progress after every 1000
items.
The Response parameter is used to tell the core if the plugin
was successful or failed. Not setting a response is considered a failure by the
core. From the run method it is only allowed to use the
setDone() or the setError() methods.
Here is a skeleton that we recommend each plugin to use in it's implementation
of the run method:
public void run(Request request, Response response, ProgressReporter progress)
{
   // Open a connection to the database
   // sc is set by init() method
   DbControl dc = sc.newDbControl();
   try
   {
      // Insert code for plugin here

      // Commit the work
      dc.commit();
      response.setDone("Plugin ended successfully");
   }
   catch (Throwable t)
   {
      // All exceptions must be catched and sent back
      // using the response object
      response.setError(t.getMessage(), Arrays.asList(t));
   }
   finally
   {
      // IMPORTANT!!! Make sure opened connections are closed
      if (dc != null) dc.close();
   }
}
Clean up all resources after executing the plugin. This method mustn't throw any exceptions.
The AbstractPlugin contains an implementation of
this method which simply sets the parameters passed to the init
method to null:
/** Clears the variables set by theinitmethod. If a subclass overrides this method it is recommended that it also callssuper.done(). */ public void done() { configuration = null; job = null; sc = null; }
InteractivePlugin interface
If you want the plugin to be able to interact with the user you must
also implement this interface. This is probably the case for most plugins.
Among the plugins supplied with the core of Base the SpotImageCreator
is one plugin that doesn't interact with the user. Instead, the web client has
special JSP pages that handles all the interaction, creates a job for it and
sets the parameters. This, kind of hardcoded, approach can be used for other plugins
as well, but then it usually requires modification of the client application as well.
The InteractivePlugin has three main tasks: tell a client application
where the plugin should be plugged in, ask users for parameters, and validate and store
those parameters. It has four methods:
Return information about where the plugin should be plugged in. Each
place is identified by a GuiContext object, which is
an Item and a Type. The item is one of the
objects defined by the net.sf.basedb.core.Item enumeration
and the type is either Type.LIST or Type.ITEM.
For example, the GuiContext = (Item.REPORTER, Type.LIST)
tells a client application that this plugin can be plugged in whenever
a list of reporters is displayed. The
GuiContext = (Item.REPORTER, Type.ITEM) tells a client application
that this plugin can be plugged in whenever a single reporter is displayed.
The first case may be appropriate for a plugin that imports or exports reporters.
The second case may be used by a plugin that updates the reporter information
from an external source (well, it may make sense to use this in the list case
as well).
The returned information is copied by the core at installation time
to make it easy to ask for all plugins for a certain GuiContext.
A typical implementation creates a static unmodifable Set
which is returned by this method. It is important that the returned set can't
be modified, since it may be a security issue if a bad behaving client
application does that.
// From the net.sf.basedb.plugins.RawDataFlatFileImporter plugin
private static final Set<GuiContext> guiContexts =
   Collections.singleton(new GuiContext(Item.RAWBIOASSAY, GuiContext.Type.ITEM));

public Set<GuiContext> getGuiContexts()
{
   return guiContexts;
}
This method is called to check if a particular item is usable for the plugin,
when the context type is Type.ITEM, i.e., the user has selected
a specific SAMPLE and the the client application is now displaying
information about that sample. Thus, our GuiContext = (Item.SAMPLE, Type.ITEM).
Now, the client application asks for a list of plugins supporting this context
and for each one in the list calls this method with the current sample as
the item parameter. The plugin should answer if it can do whatever
it is supposed to do by returning null or a string containing
a message why it can't.
Here is a real example from the RawDataFlatFileImporter plugin
which imports raw data to a RawBioAssay. Thus,
GuiContext = (Item.RAWBIOASSAY, Type.ITEM), but the plugin can
only import data if there isn't any already, and if the raw bioassay has the
same raw data type as the plugin has been configured for.
/**
   Returns null if the item is a {@link RawBioAssay} of the correct
   {@link RawDataType} and doesn't already have spots.
*/
public String isInContext(GuiContext context, Object item)
{
   String message = null;
   if (item == null)
   {
      message = "The object is null";
   }
   else if (!(item instanceof RawBioAssay))
   {
      message = "The object is not a RawBioAssay: " + item;
   }
   else
   {
      RawBioAssay rba = (RawBioAssay)item;
      String rawDataType = (String)configuration.getValue("rawDataType");
      if (rba.getSpots() > 0)
      {
         message = "The raw bioassay already has spots: " + rba.getName();
      }
      else if (!rba.getRawDataType().getId().equals(rawDataType))
      {
         message = "Unsupported raw data type: " + rba.getRawDataType().getName();
      }
   }
   return message;
}
Ask the plugin for parameters that needs to be entered by the user. The
GuiContext parameter is one of the contexts returned by the
getGuiContexts method. The command is string telling the plugin
what command was executed. There are two predefined commands but as you will see
the plugin may define it's own commands. The two predefined commands are defined
in the net.sf.basedb.core.plugin.Request class:
Request.COMMAND_CONFIGURE_PLUGIN: Used when an administator is
initiating a configuration of the plugin.
Request.COMMAND_CONFIGURE_JOB: Used when a user has selected
the plugin for running a job.
Given this information the plugin must return a RequestInformation
object. This is simply a title, a description and a list of parameters.
Usually the title will end up as the input form title and the description
as a help text for the entire form. Do not put information about the
individual parameters in this description, since each parameter has a
description of their own.
For example, when runing an import plugin it needs to ask for the file to import from and if existing items should be updated or not:
// The complete request information
private RequestInformation configureJob;

// The parameter that asks for a file to import from
private PluginParameter<File> fileParameter;

// The parameter that asks if existing items should be updated or not
private PluginParameter<Boolean> updateExistingParameter;

public RequestInformation getRequestInformation(GuiContext context, String command)
   throws BaseException
{
   RequestInformation requestInformation = null;
   if (command.equals(Request.COMMAND_CONFIGURE_PLUGIN))
   {
      requestInformation = getConfigurePlugin();
   }
   else if (command.equals(Request.COMMAND_CONFIGURE_JOB))
   {
      requestInformation = getConfigureJob();
   }
   return requestInformation;
}

/**
   Get (and build) the request information for starting a job.
*/
private RequestInformation getConfigureJob()
{
   if (configureJob == null)
   {
      fileParameter = new PluginParameter<File>(
         "file",
         "File",
         "The file to import the data from",
         new FileParameterType(null, true, 1)
      );

      updateExistingParameter = new PluginParameter<Boolean>(
         "updateExisting",
         "Update existing items",
         "If this option is selected, already existing items will be updated " +
         " with the information in the file. If this option isn't selected " +
         " existing items are left untouched.",
         new BooleanParameterType(false, true)
      );

      List<PluginParameter<?>> parameters =
         new ArrayList<PluginParameter<?>>(2);
      parameters.add(fileParameter);
      parameters.add(updateExistingParameter);

      configureJob = new RequestInformation
      (
         Request.COMMAND_CONFIGURE_JOB,
         "Select a file to import items from",
         "TODO - description",
         parameters
      );
   }
   return configureJob;
}
As you can see it takes some code to put together a RequestInformation
object. For each parameter needed you need one PluginParameter
object and one ParameterType object. Actually, a ParameterType
can be reused for more than one PluginParameter. For example, if
your plugin need 10 string which all are required you can use a single
ParameterType for all of them:
StringParameterType stringPT = new StringParameterType(255, null, true);
PluginParameter one = new PluginParameter("one", "One", "First string", stringPT);
PluginParameter two = new PluginParameter("two", "Two", "Second string", stringPT);
// ... and so on
The ParameterType is an abstract base class for several subclasses
each implementing a specific type of parameter. The list of subclasses may
grow in the future, but here are the most important ones currently implemented:
Note! Most parameter types include support for suppying a predefined list of options to select from. In that case the list will be displayed as a drop-down list for the user, otherwise a free input field is used.
StringParameterType: Asks for a string value. Includes
an option for specifying the maximum length of the string.
FloatParameterType, DoubleParameterType, IntegerParameterType, LongParameterType:
Asks for numerical values. Includes options for specifying a range (min/max)
of allowed values.
BooleanParameterType: Asks for a boolean value.
DateParameterType: Asks for a date.
FileParameterType: Asks for a file item.
ItemParameterType: Asks for any other item. This parameter
type requires that a list of options is supplied, except when the item type
asked for matches the current GuiContext, in which case the
currently selected item is used as the parameter value.
PathParameterType: Ask for a path to a file or directory.
The path may be non-existing and should be used when a plugin needs an
output destination, i.e., the file to export to, or a directory
where the output files should be placed.
You can also create a PluginParameter with a null name and
ParameterType. In that case, the core will not ask for input from
the user, instead it is used as a section header, allowing you to group parameters
into different sections which increase the readability of the input parameters page.
PluginParameter firstSection = new PluginParameter(null, "First section", null, null);
PluginParameter secondSection = new PluginParameter(null, "First section", null, null);
// ...

parameters.add(firstSection);
parameters.add(firstParameterInFirstSection);
parameters.add(secondParameteInFirstSection);

parameters.add(secondSection);
parameters.add(firstParameterInSecondSection);
parameters.add(secondParameteInSecondSection);
Sends parameter values entered by the user for processing by the plugin. Typically the plugin should validate that the parameter values are correct and then store them in database.
No validation is done by the core, except converting the input to the
correct object type, ie. if the parameter asked for a Float the input string
is parsed and converted to a Float. If you have extended the
AbstractPlugin class it is very easy to validate the parameters
using it's validateRequestParameters() method. This method
takes the same list of PluginParameter:s used in the
RequestInformation object and uses that information for validation.
It returns null or a list of Throwable.
When the parameters have been validated thay need to be stored. Once again, it is
very easy if you use one of the AbstractPlugin.storeValue() or
AbstractPlugin.storeValues() methods.
The configure method works much like the Plugin.run
method. It must return the result in the Response object,
i.e., it shouldn't trow any exceptions. Here is an example of part of an
implementation (building on the example above).
public void configure(GuiContext context, Request request, Response response)
{
   String command = request.getCommand();
   try
   {
      if (command.equals(Request.COMMAND_CONFIGURE_PLUGIN))
      {
         // TODO
      }
      else if (command.equals(Request.COMMAND_CONFIGURE_JOB))
      {
         // Validate user input
         List<Throwable> errors =
            validateRequestParameters(getConfigureJob().getParameters(), request);
         if (errors != null)
         {
            response.setError(errors.size() +
               " invalid parameter(s) were found in the request", errors);
            return;
         }

         // Store user input
         storeValue(job, request, fileParameter);
         storeValue(job, request, updateExistingParameter);

         // We are happy and done
         response.setDone("Job configuration complete", Job.ExecutionTime.SHORT);
         // TODO - check file size to make a better estimate of execution time
      }
   }
   catch (Throwable ex)
   {
      response.setError(ex.getMessage(), Arrays.asList(ex));
   }
}
Note that the setDone() has a second parameter Job.ExecutionTime.
It is an indication about how long time it will take to execute the plugin. This is
of interest for job queue managers which probably doesn't want to start too many
long-running jobs at the same time blocking the entire system. Please
try to use this parameter wisely and not use the SHORT value out of
old habit all the time.
The response also has a setContinue() method which tells the core
that the plugin needs more parameters, i.e., the core will then call
getRequestInformation() again with the new command, let the user
enter values, and the call configure() with the new values.
This process is repeated until the plugin reports that it is done or
an error occurs.
An important note is that during this iteration it is the same instance
of the plugin that is used. However, no parameter values are stored in the database
until setDone() is called. Then, the plugin instance is usually
discarded. The execution of the plugin happens in a new instance and maybe
on a different server.
Tip! You doesn't have to store all values the plugin asked for in the first place. You may even choose to store different values than those that were entered. For example, you might ask for the mass and height of a person and then only store the body mass index, which is calculated from those values.
We recommend that each plugin or group of related plugins are compiled
separately. To be able to use the plugin it must be put in a JAR file.
Place the JAR file on the server outside the web servers classpath, ie. not in
the WEB-INF/lib. Our recommendation is to place the plugin JAR in
<base-dir>/plugins/<name-of-plugin>/
The main benefit from placing the JAR file outside the classpath is that Base uses it's own classloader that supports unloading of the classes as well. This means that you may replace the JAR file with a new version without restarting the web server.
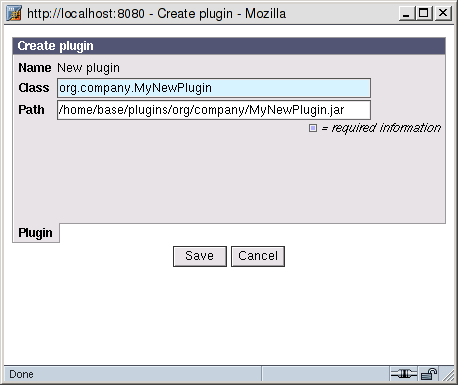
Then, to install the plugin log in a an administrator and go to the
Administrate --> Plugins --> Definitions
page. Click the New… button and enter the
class name and the path to the JAR file in the form that opens
in the popup window.
When you click save, the Base class loader will load the specified JAR file
and class and check that it implements the Plugin interface.
Then, it creates an instance of that class, calls Plugin.getAbout()
and Plugin.getMainType(). If it is an InteractivePlugin
it will also call InteractivePlugin.getGuiContexts(). This information
is stored in the database.
The installation will do one more thing. It will check which other interfaces the
plugin implements and check against the list of registered PluginType:s.
The PluginType system has not really been put into use yet. The core
defines the AutoDetectingImporter which can be used for all import plugins
that supports automatic detection of file formats. Read more about this in the
Plug-ins for importing data document.
Now the administrator may continue by creating a new configuration for the
plugin (assuming that is an InteractivePlugin. When the
administrator starts the configuration sequence the
following will happen:
Plugin.init() method.
InteractivePlugin.getRequestInformation() method,
with command = Request.COMMAND_CONFIGURE_PLUGIN and a null
GuiContext.
InteractivePlugin.configure().
Plugin.done()
is called and the plugin instance is discarded.
The steps for creating a new job follows the same procedure except that
the first command is Request.COMMAND_CONFIGURE_JOB and
the GuiContext isn't null.
Here is a simple example of how you might organize your project using ant (http://ant.apache.org) as the build tool. This is just a recommendation that we have found to be working well. You may choose to do it another way.
PLUGINNAME/
PLUGINNAME/bin/
PLUGINNAME/lib/
PLUGINNAME/src/org/company/
The bin/ directory is empty to start with. It will contain the
compiled code. The lib/ directory contains the JAR files
your plugin uses (including the BASE2Core.jar). The src/
directory contains your source code.
In the root of your directory, create the build file: build.xml.
Here is an example that will compile your plugin and put it in a JAR file.
If your plugin depends on other JAR files than the Base2Core.jar
you should list them in the MANIFEST.MF file. Otherwise you should remove the
manifest attribute of the jar tag in the build file.
Manifest-Version: 1.0
Class-Path: OtherJar.jar ASecondJar.jar
Compile the plugin simply by typing ant in the console
window. If all went well the MyPlugin.jar will be
created in the same directory.
To install the plugin copy the JAR file to the server including the dependent JAR files (if any). Place all files together in the same directory. Then follow the instructions in section 2 for making Base aware of the plugin.
This is an advanced option for plugins that require a different interface
for specifying plugin parameters than the default list showing each parameter
at a time. This feature is used by settin the RequestInformation.getJspPage()
property when construction the request information object. If this property has a non-null
value, the web client will send the browser to the specified JSP page instead of
to the generic parameter input page.
When setting the JSP page you should not specify any path information. The web client
has a special location for these JSP pages, generated from the package name of
your plugin and the returned values. If the plugin is located in the package
org.company the JSP page must be located in
<www-root>/plugins/org/company/. Please note that the browser
still thinks that it is showing the regular page at the usual location:
<www-root>/common/plugin/index.jsp, so all links in your JSP page
should be relative to that directory.
Even if you use your own JSP page we recommend that you use the built-in facility for passing the parameters back to the plugin. For this to work you must:
PluginParameter objects as usual
parameter:<name-of-parameter>
for example:
// Plugin generate PluginParameter
StringParameterType stringPT = new StringParameterType(255, null, true);
PluginParameter one = new PluginParameter("one", "One", "First string", stringPT);
PluginParameter two = new PluginParameter("two", "Two", "Second string", stringPT);

// JSP should name fiels as:
First string: <input type="text" name="parameter:one"><br>
Second stirng: <input type="text" name="parameter:two">
index.jsp with some parameters:
<form action="index.jsp" method="post">
<input type="hidden" name="ID" value="<%=ID%>">
<input type="hidden" name="cmd" value="SetParameters">
...
</form>
In your JSP page you will probably need to access some information
like the SessionControl and possible even the
RequestInformation object created by your plugin.
// Get session control and it's ID (required to post to index.jsp)
final SessionControl sc = Base.getExistingSessionControl(pageContext, true);
final String ID = sc.getId();

// Get information about the current request to the plugin
PluginConfigurationRequest pcRequest =
   (PluginConfigurationRequest)sc.getSessionSetting("plugin.configure.request");
PluginDefinition plugin =
   (PluginDefinition)sc.getSessionSetting("plugin.configure.plugin");
PluginConfiguration pluginConfig =
   (PluginConfiguration)sc.getSessionSetting("plugin.configure.config");
PluginDefinition job =
   (PluginDefinition)sc.getSessionSetting("plugin.configure.job");
RequestInformation ri = pcRequest.getRequestInformation();