Table of Contents
In some places the only way to get data into BASE is to import it from a file. This typically includes raw data, array design features, reporters and other things, which would be inconvenient to enter by hand due to the large number of data items. There is also convenience batch importers for importing other items such as biosources, samples, and annotations. The batch importers are described later in this chapter after the general import description.
Normally, a plug-in handles one type of items and may require a configuration. For example, most import plug-ins need some information about how to find headers and data lines in files. BASE ships with a number of import plug-ins as a part of the core plug-ins package, cf. Section A.3, “Core import plug-ins”. The core plug-in section links to configuration examples for some of the plugins. Go to to check which plug-ins are installed on your BASE server. When BASE finds a plug-in that supports import of a certain type of item an button is displayed in the toolbar on either the list view or the single-item view.
![[Note]](../gfx/admonitions/note.png) |
No "Import" button? |
|---|---|
|
If the import button is missing from a page were you would expect to find them this usually means that:
Contact the server administrator or a similar user that has permission to administrate the plug-ins. |
Starting a data import is done by a wizard-like interface. There are a number of step you have to go through:
- Select a plug-in and file format to use, or use the auto detect option.
- If you selected the auto detection function, you must select a file to use.
- Specify plug-in parameters.
- Add the import job to the job queue.
- Wait for the job to finish.
Click on the button in the toolbar to start the import wizard. The first step is to select which plug-in and, if supported, which file format to use. There is also an auto detect option that lets you select a file and have BASE try to find a suitable plug-in/file format to use.
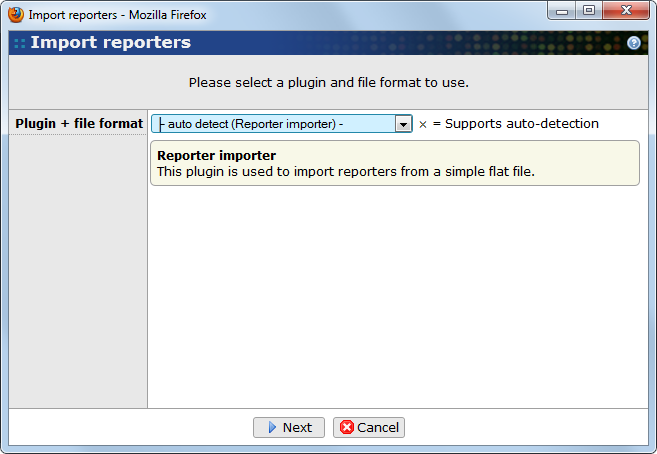
- Plugin + file format
-
This is a combined list of plug-ins and their respective file format configurations. The list only includes combinations that the logged in user has permission to use. If you select an entry a short description about the plug-in and configuration is displayed below the lists. More information about the plug-ins can be found under the menu choices and
File format vs. Configuration A file format is the same thing as a plug-in configuration. It may be confusing that the interface sometimes use file format and sometimes use configuration, but for now, we'll have to live with it.
Proceed to the next step by clicking on the button.
The auto detect function lets you select a file and have BASE try to find a suitable plug-in and file format. This option is selected by default in the combined plug-in and file format list when there is at least one plug-in that supports auto detection.
|
Support of auto detect |
|---|---|
|
Not all plug-ins support auto detection. The ones that do are marked in the list with ×. |
Select the auto detect (all) option to search for a file format in all plug-ins that supports the feature, or select the auto detect (plugin) option to only search the file formats for a specific plug-in. Continue to the next step by clicking on the button.
You must now select a file to import from.
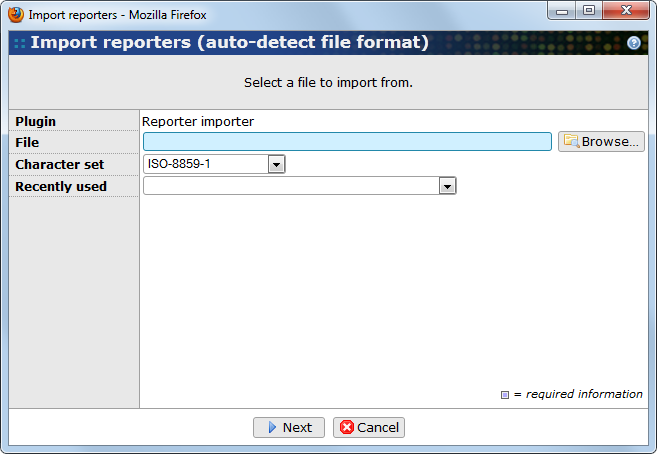
- Plugin
-
Displays the selected plug-in or all if the auto-detection is used on all supporting plug-ins.
- File
-
Enter the path and file name for the file you want to use. Use the button to browse after the file in BASE's file system. If the file does not exist in the file system you have the option to upload it. Read more about this in Chapter 7, File management.
- Character set
-
The character set used in text files. If the selected file has been configured with a character set the correct option is automatically selected. In all cases, you have the option to override the default selection. Most files, typically use either the UTF-8 or ISO-8859-1 character set.
- Recently used
-
A list of files you have recently used for auto detection.
Click on the button to start the auto detection. There are three possible outcomes:
-
Exactly one matching plug-in and file format is found. The next step is to configure any additional parameters needed by the plug-in. This is the same step as if you had selected the same plug-in and file format in the first step.
-
If no matching plug-in and file format is found an error message is displayed. If logged in with enough permissions to do so there is an option to create a new file format/configuration.
-
If multiple matching plug-ins and file formats are found you will be taken back to the first step. This time the lists will only include the matching plug-ins/file formats and the auto detect option is not present.
When you have selected a plug-in and file format or used the auto detect function to find one, a form where you you can enter additional parameters for the plug-in is displayed.
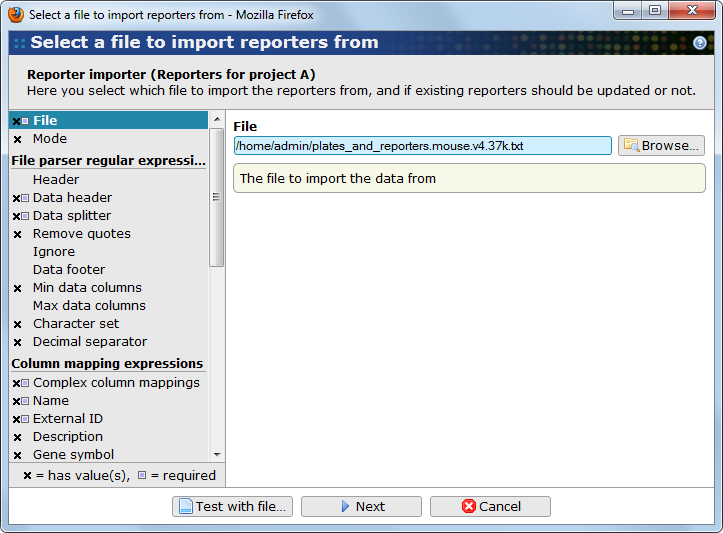
The top of the window displays the names of the selected plug-in and configuration, a list with parameters to the left, an area for input fields to the right and buttons to proceed with at the bottom. Click on a parameter in the parameter list to show the form fields for entering values for the parameter to the right. Parameters with an X in front of their names already have a value. Parameters marked with a blue rectangle are required and must be given a value before it is possible to proceed.
The parameter list is very different from plug-in to plug-in. Common parameters for import plug-ins are:
- File
-
The file to import data from. A value is already set if you used the auto detect function.
- File parser regular expressions
-
Various regular expressions that are used when parsing the file to ensure that the data is found. In most cases, all values are taken from the matched configuration and can be left as is.
- Error handling
-
A section which contains different options how to handle errors when parsing the file. Normally you can select if the import should fail as a whole or if only the line with the error should be skipped.
Continue to the next step by clicking the button.
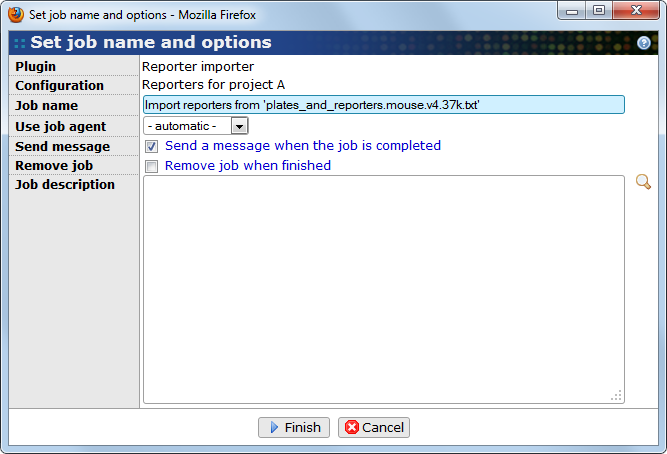
In this window should information about the job be filled in, like name and description. Where name is required and need to have valid string as a value. There are also two check boxes in this page.
- Name
-
Most plug-ins should suggest a name for the job, but you can change it if you want to.
- Use job agent
-
This option is only available if the BASE system has been configured with job agents and the logged in user has
SELECT_JOBAGENTpermission. Select the automatic option to let BASE automatically select a job agent or select a specific option to force the use of that particular job agent. - Send message
-
Tick this check box if the job should send you a message when it is finished, otherwise untick it
- Remove job
-
If this check box is ticked, the job will be marked as removed when it is finished, on condition that it was finished successfully. This is only available for import- and export- plugins.
Clicking on when everything is set will end the job configuration and place the job in the job queue. A self-refreshing window appears with information about the job's status and execution time. How long time it takes before the job starts to run depends on which priority it and the other jobs in the queue have. The job does not depend on the status window to be able to run and the window can be closed without interrupting the execution.
![[Tip]](../gfx/admonitions/tip.png) |
View job status |
|---|---|
|
A job's status can be viewed at any time by opening it from the job list page, . |
There are in general several possibilities to import data into BASE. Bulk data such as reporter information and raw data imports are handled by plug-ins created for these tasks. For item types that are imported in more moderate quantities a suite of batch item importers available (Section A.3.1, “Core batch import plug-ins”). These importers allows the user to create new items in BASE and define item properties and associations between items using tab-separated (or equivalent) files.
The batch importers are available for most users and they may have been pre-configured but there is no requirement to configure the batch importer plug-ins. Here we assume that no plug-in configuration exists for the batch importers. Pre-configuration of the importers is really only needed for facilities that perform the same imports regularly whereas for occasional use the provided wizard is sufficient. Configuring the importers follows the route described in Section 22.2, “Plug-in configurations”.
The batch importers either creates new items or updates already existing items. In either mode the plugin can set values for
-
Simple properties, eg., string values, numeric values, dates, etc.
-
Single-item references, eg., protocol, label, software, owner, etc.
-
Multi-item references are references to several other items of the same type. The extracts of a physical bioassay or pooled samples are two examples of items that refer to several other items; a physical bioassay may contain several extracts and a sample may be a pool of several samples. In some cases a multi-item reference is bundled with simple values, eg., used quantity of a source biomaterial, the position an extract is used on, etc. Multi-item references are never removed by the importer, only added or updated. Removing an item from a multi-item reference is a manual procedure to be done using the web interface.
The batch importers do not set values for annotations since this is handled by the annotation importer plug-in (Section 10.2.4, “Mass annotation import plug-in”). However, the annotation importer and batch item importers have similar behaviour and functionality to minimize the learning cost for users.
The importer only works with one type of items at each use and can be used in a dry-run mode where everything is performed as if a real import is taking place, but the work (transaction) is not committed to the database. The result of the test can be stored to a log file and the user can examine the output to see how an actual import would perform. Summary results such as the number of items imported and the number of failed items are reported after the import is finished, and in the case of non-recoverable failure the reason is reported.
For proper and efficient use of the batch importers users need to understand how the files to be imported should be formatted. The input file must be organised into columns separated by a specified character such as a tab or comma character. The data header line contains the column headers which defines the contents of each column and defines the beginning of item data in the file. The item data block continues until the end of the file or to an optional data footer line defining the end of the data block.
When reading data for an item the plug-in must use some information for identifying items. Depending on item type there are two or three options to select the item identifier
-
Using the internal id. This is always unique for a specific BASE server.
-
Using the name. This may or may not be unique.
-
Some items have an externalId. This may or may not be unique.
-
Array slides may have a barcode which is similar to the externalId.
-
An annotation type that has been flagged as identifier. See Section 10.1, “Annotation Types”.
It is important that the identifier selected is unique in the file used, or if the file is used to update items already existing in BASE the identifier should also be unique in BASE for the user performing the update. The plug-in will check uniqueness when default parameters are used but the user may change the default behaviour.
Data for a single item may be split into multiple lines. The first line contains simple properties and single-item references, and the first multi-item reference. If there are more multi-item references they should be on the following lines with empty values in all other columns, except for the column holding the item identifier. The item identifier must have the same value on all lines associated with the item. Lines containing other data than multi-item references will be ignored or may be considered as an error depending on plug-in parameter settings. The reason for treating copied data entries as an error is to catch situations where two items is given the same item identifier by accident.
This section discuss specific parameters and features of the batch importers. The general use of the batch importers follow the description outlined in Section 19.1, “General import procedure” and the setting of column mapping parameters is assisted with the Test with file function described in Section 22.2.3, “The Test with file function”. The column headers are mapped to item properties at each use of the plug-in but, as pointed out above, they can also be predefined by saving settings as a plug-in configuration. The configuration also includes separator character and other information that is needed to parse files. The ability to save configurations depends on user credential and is by default only granted to administrators.
The plug-in parameter follows the standard BASE plug-in layout and shows help information for selected parameters. The list below comments on some of the parameters available.
- Mode
-
Select the mode of the plug-in. The plug-in can create new items and/or update items already existing in BASE. This setting is available to allow the user to make a conscious choice of how to treat missing or already existing items. For example, if the user selects to only update items already existing the plug-in will complain if an item in the file does not exist in BASE (using default error condition treatment). This adds an extra layer of security and diagnostics for the user during import.
Running from an item list If the importer is started from the Members tab of an item list the create mode is not available and the the update mode will only update items that are members of the list. In addition, there are two other modes: add-members and remove-members that can be used to add or remove members from the item list.
- Data directory
-
This option is only available for items that has support for attaching files (eg. array design, derived bioassay, etc.). This setting is used to resolve file references that doesn't include a complete absolute path.
- Identification method
-
This parameter defines the method to use to find already existing items. The parameter can only be set to a set of item properties listed in the plug-in parameter dialog. The property selected by the user must be mapped to a column in the file. For example, if Name selected as identification method, a column mapping must be set for Name. If an annotation type method is selected (they are prefixed with [A]) a column mapping must be set for the Annotation ID parameter.
- Item subtypes
-
Only look for existing items among the selected subtypes. If no subtype is selected all items are searched. If exactly one subtype is selected new items are automatically created with this subtype (unless it is overridden by specific subtype values in the import file).
- Owned by me, Shared to me, In current project, and Owned by others
-
Defines the set of items the plug-in should look in when it checks whether an item already exists. The options are the same that are available in list views and the actual set of parameters depends in user credentials.
- Column mapping expressions
-
Use the Test with file function described in Section 22.2.3, “The Test with file function” to set the column mapping parameters.
When working with biomaterial items, the Parent type property is used to tell the plug-in how to find parent items. This only has to be set if the parent item is of the same type as the biomaterial being imported since the default is to look for the nearest parent type in the predefined hierarchy. In ascending order the BASE ordering of parent - child - grandchild - ... item relation is biosource - sample - extract.
The values accepted for Parent type are
BIOSOURCE,SAMPLEorEXTRACT. Sometimes all items in a file to be imported have the same parent type but there is no column with this information. This can be resolved by setting the Parent type mapping to a constant string (eg. no backslash '\' character).Project default items When creating new items some properties (eg. protocol, software, hardware, etc.) are assigned default values from the currently active project if no mapping has been specified for that property. It is also possible to access project default values when a a mapping is used. Use
=default()as a mapping expression to set the property to the project default value or=default(col('foo'))to use the value from columnfooif it is not empty and the project default otherwise. Do not forget to enable theComplex column mappingsoption. - Permissions
-
This is a column mapping that can be used to update the permissions set on items. Normally, new items are only shared to the active project (if any). By naming a permission template, new items are shared using the permissions from that template instead. Permissions on already existing items are merged with the permission from the template.
After setting the parameters, select Next. Another parameter dialog will appear where error handling options can be set among with
- Log file
-
Setting this parameter will turn on logging. The plug-in will give detailed information about how the file is parsed. This is useful for resolving file parsing issues.
- Dry run
-
Enable or disable test run of the plug-in. If enabled the plug-in will parse and simulate an import. When enabling this option you should set the Log file also. The dry run mode allows testing of large imports and updates by creating a log file that can be examined for inconsistencies before actually performing the action without a safety net.
During file parsing the plug-in will look for items referenced on each line. There are three outcomes of this item search
-
No item is found. Depending on parameter settings this may abort the plug-in, the plug-in may ignore the line, or a new item is created.
-
One item is found. This is the item that is going to be updated.
-
More than one item is found. Depending on parameter settings this may abort the plug-in or the plug-in may ignore the line.
The item batch importers are not designed to change or create annotations. There is another plug-in for this, see Section 10.2.4, “Mass annotation import plug-in” for an introduction to the annotation importer.
There is no need to map all columns when running the importer. When new items are created usually the only mandatory entry is Name, and when running the plug-in in update mode only the column defining the item identification property needs to be defined. This can be utilized when only one or a few properties needs to be updated; map only columns that should be changed and the plug-in will ignore the other properties and leave them as they are already stored in BASE. This also means that if one property should be deleted then that property must be mapped and the value must be empty in the file. Note, multi-item reference cannot be deleted with the batch importer, and deletion of multi-item references must be done using the web interface.
When parent and other relations are created using the plug-in the referenced items are properly linked and updated. This means that when a quantity that decreases a referenced item is used, the referenced item is updated accordingly. In consequence, if the relation is removed in a later update - maybe wrong parent was referenced - the referenced item is restored and any decrease of quantities are also reset.
A common mistake is to forget to make sure that some of the referenced items already exists in BASE, or at least are accessible for the user performing the import. Items such as protocols and labels must be added before referencing them. This is of course also true for other items but during batch import one usually follows the natural order of first importing biosources, samples, extracts, and so on. In this way the parents are always present and may be referenced without any issues.