Table of Contents
Before data stored in BASE can be used outside of BASE, the data must first be exported to a file. When the export job finishes the file can be downloaded from the BASE file system or optionally downloaded immediately. Exporting data is possible for almost all kind of data and the export is done by a job that runs an export plug-in for the current context. An export job is started by clicking on in the toolbar, the click action will open a pop-up window allowing you to select plug-in and specify parameters for it.
Normally, specific plug-ins handles different type of items, but some plug-ins, for example the table exporter plug-in, can work with several types of items. BASE ships with a number of export plug-ins as a part of the core plug-ins package, cf. Section A.2, “Core export plug-ins”. Go to to check which plug-ins are installed on your BASE server. When BASE finds a plug-in that supports export of a certain type of item an button is displayed in the toolbar on either the list view or the single-item view.
![[Note]](../gfx/admonitions/note.png) |
No "Export" button? |
|---|---|
|
If the export button is missing from a page were you would expect to find them this usually means that:
Contact the server administrator or a similar user that has permission to administrate the plug-ins. |
This dialog is very similar to the dialog for selecting an import plug-in. See Figure 19.1, “Select plug-in and file format” for a screenshot example.
The first thing in the configuration process is to choose which plug-in to use and a configuration for those plug-ins that require it. More information about the plug-ins can be found in each plug-in's documentation.
|
Note |
|---|---|
| If there is only one plug-in and configuration available, this step is skipped and you are taken directly to next step. |
- Plugin + configuration
-
Select the plug-in and configuration to use. The list only shows combinations that the logged in user has permission to use.
Click on to show the configuration of parameters for the job.
The top of the window displays the names of the selected plug-in and configuration, a list with parameters to the left, an area for input fields to the right and buttons to proceed with at the bottom. Click on a parameter in the parameter list to show the form fields for entering values for the parameter to the right. Parameters with an X in front of their names already have a value. Parameters marked with a blue rectangle are required and must be given a value before it is possible to proceed.
The parameters list is very different from plug-in to plug-in. Common parameters for export plug-ins are:
- Save as
-
The path and file name in the BASE file system where the exported data should be saved. Some plug-ins support immediate download to the local file system if you leave the file parameter empty. For saving the exported data within the BASE file system, it's recommended to use the button to get the right path and then complement it with the file's name.
Click on to proceed to next configuration window.
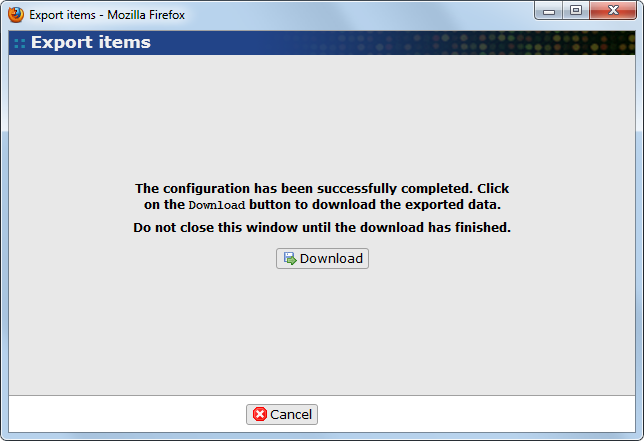
If the selected plug-in supports immediate download and the file parameter were left empty a new window with a button is displayed. Click on this button to start the plug-in execution. Do not close the window until a message saying that the export was successful (or failed) is displayed. Your browser should open a dialog asking you were to save the file on your local computer.
If you choose to save the file within the BASE file system, there will be a window where the job should get a name and optionally a description. There are also two check boxes in this window.
- Send message
-
Tick this check box if the job should send you a message when it is finished, otherwise untick it
- Remove job
-
If this is ticked, the job will be marked as removed when it is finished, on condition that it was finished successfully. This is only available for import- and export- plugins.
By then clicking on the configuration process will end and the job will be put in the job queue. A self-refreshing window appears with information about the job's status and execution time. The job is not dependent on the status window to run and it therefore be closed without interrupting the execution of the job.
![[Tip]](../gfx/admonitions/tip.png) |
View job status |
|---|---|
|
A job's status can be viewed at any time by opening it from the job list page, . |
The table exporter is a generic export plug-in that works with almost all list views in BASE. It can export the lists as an XML-file or a tab-separated text file. The table exporter is started, like the other export plug-ins, by clicking on in the toolbar.
Then select the Table exporter and click on the button. The plug-in selection step is only displayed if there is more than one export plug-in that can be used in the current context. Usually, the table exporter is the only plug-in and you will be take directly to the configuration dialog.
Unlike other plug-ins, the table exporter does not use the generic parameter input dialog. It has a customized dialog that should be easier to use.
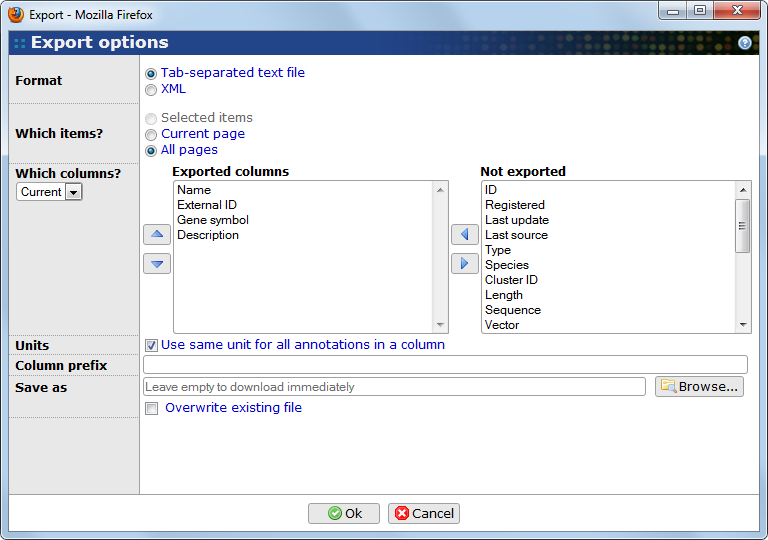
- Format
-
The generated file can be either a tab-separated text file or an XML file. The XML-file option will generate a tag for each item and these will contain a child tag with property value for each selected column.
- Which items?
-
This option decide which items that should be included in the exported data.
-
Selected items: Only selected items will be exported. This options is not available if no items have been selected on the list page.
-
Current page: Exports all items viewed on the current list page.
-
All pages: Items on all pages will be exported.
-
- Which columns?
-
Names of those columns that should be included in the export should be listed in the Exported columns to the left. A column name is moved to the other list-box by first marking it and then clicking on one of the buttons located between the list-boxes.
The order in which the columns should be exported in can be changed with the buttons to the left of the list. Simply mark a name of a column and click on the buttons to move the name either up or down in the list.
Using presets Use the drop down list of presets, located under the option name, to easily get predefined or own presets of column settings.
- Units
-
If the export includes annotation with units, the exporter normally uses the same unit that was used when annotating each item. This can be different from item to item. Select this option to force all annotation values to use the same unit (=the default unit for the annotation type).
- Column prefix
-
Adds a prefix to each column header. This is useful for keeping column names unique when combining multiple files outside of BASE.
- Save as
-
The path and file name where the exported data should be saved. Leave the text field empty if the file is to be downloaded immediately or enter a path within the BASE file system to store the file on the server. Check Overwrite existing file if an already existing file with the same name should be overwritten.
Click on to proceed when all options have been set for the export.