No matter what you are doing in BASE some things works more or less in the same way. This section covers things that are common for most parts of BASE.
You mostly work with a single type of item at a time. This is reflected in the menu system. For example, use → to work with samples, and → to work with experiments. In most cases the list view for that type of item is displayed. The list view, as the name says, is used to list all items. There are two more standard views, the single-item view and the edit view.
- List view
This view lists all items of a certain type. The view allows you to search and it is possible to configure which information to show for each item. It also contains functions that can be used on multiple items at the same time, for example, delete, share and export. See Section 6.4, “Listing items” for more information.
- Single-item view
Displays information about a single item. Sometimes it is very little, sometimes it is very much and the information may be divided into multiple tabs.
- Edit view
This view is used for editing the information about a single item. It is always displayed as a pop-up window.
New items are mostly created from the list view. For example, to create a new experiment go to the → page. Here you will find a button in the toolbar. The button is disabled if you do not have permission to create new experiments. Otherwise, click on it and enter any required information in the pop-up dialog. Sometimes there are multiple tabs in this dialog. In the case of experiments there are three tabs: Experiment, Publication and Experimental factors. As a general rule, only the first tab has information that is required. The information in all other tabs are optional.
In some places you will also find actions that create items directly in the list. For example in the list of samples or on the single-item view for a sample you can create an extract using that sample as the parent. If you use such links the parent item will in most cases be selected automatically, which saves you a few clicks when creating new items.
Click on the button to save the new item to the database or on the button to abort.
![[Note]](../../gfx/admonitions/note.gif) |
Note |
|---|---|
|
To speed up data entry when adding multiple new items there are a few tricks you can use to make the web client supply default values for most properties. To find a default value the following checklist is used in this order:
|
On all single-item views there is an button in the toolbar that opens a pop-up dialog for editing the properties of the item. This button is disabled if the logged in user does not have write permission for the item.
You can also open the edit pop-up in most other places where the item appears, for example, in lists or the single-item view of a related item. Press and hold one of the CTRL, ALT or SHIFT keys while clicking on the link and the edit window will open in a pop-up. If you do not have write permission on the item there is no meaning to open the edit pop-up and you will be taken to the single-item view page instead.
Click on the button to save the changes to the database or on the button to abort.
You can delete items either from the list view or from a single-item view. In both cases, deleted items are only moved to the trashcan. No information is removed from the database. This allows you to restore items if you later find out that you need them again. In fact, there is nothing special about a removed item. It can still be used for the same things as any non-removed item can.
![[Important]](../../gfx/admonitions/important.gif) |
Important |
|---|---|
|
To really delete items from the database you have two options:
|
To delete items from the list view you must first mark the checkbox for each item you want to delete. Then, click on the button. The list should refresh itself automatically. If you want to confirm that the items have been removed use the view / presets dropdown and select the Removed option. The removed items should now be displayed in the list with a small trashcan icon to indicate that they are located in the trashcan.
To delete items from the single-item view, click on the button in the toolbar. The page will refresh itself automatically and a small trashcan icon should be displayed. If you do not have permission to delete the item the delete button is disabled.
You can restore deleted items either from the trashcan, from the list view, or from the single-item view. This section only covers the last two cases. The trashcan is described in another section (Section 6.5, “Trashcan”).
To delete items from the list view you must first make the deleted items appear in the list. This is easy, just use the view / presets dropdown and select the Removed option. The list should refresh itself automatically. The removed items are displayed in the list with a small trashcan icon to indicate that they are located in the trashcan. Then, mark the checkbox for each item that you want to restore and click the button. The list should refresh itself automatically and the trashcan icon should be gone from the restored items.
To restore items from the single-item view, click on the button in the toolbar. The page will refresh itself automatically and the small trashcan icon should be gone. If you do not have permission to restore the item the restore button is disabled.
Sharing data with other users is an important feature of BASE, which allows you cooperate in teams. If you follow the instructions in Chapter 7, Projects and the permission system you will find that you almost never have to share items manually to other users. This is because whenever you work with an active project each new item you create will automatically be shared according to the settings of that project. In most cases, this is all you need.
If you still need to manually share your data with other users, here is how to do it.
From a list view, mark the checkbox for each item you want to share. Then, click on the button. If you are on a single-item page, click on the button on that page. In both cases, this will open the Set access permissions dialog window.
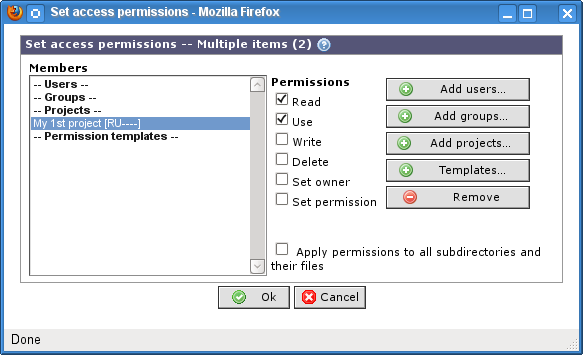
- Members
-
The list displays the users, groups and projects that already has access to the items you selected. The list shows the name and the permission level. The permission level uses a one-letter code as follows:
- R = Read
- U = Use
- W = Write
- D = Delete
- O = Set owner
- P = Set permission
Instead of a permission code, the word varying may be displayed. This happens if the items you selected have been shared with different permission.
The Permission templates part of the list is always empty to begin with.
- Permissions
-
When you select a user, group or project in the list, the checkboxes will display the current permission. The exception is if the permissions are varying, in which case no checkboxes are checked. To change the permissions just check the permissions you want to grant or uncheck the permissions you want to revoke. You can select more than one user, group or project and change the permissions for all of them at once.
The permission boxes are disabled if a permission template is selected. The permissions are already part of the template and can't be changed here.
-
Opens a pop-up window that allows you to select users to share the items to. In the pop-up window, mark one or more users and click on the button. The pop-up window will only list users that you have permission to read. Unless you are an administrator, this usually means that you can only see users that:
you share group memberships with (the Everyone group doesn't count)
are members of the currently active project, if any.
Users that already have access to the item are not included in the list. If you don't see a user that you want to share an item to, you'll need to talk to an administrator for setting up the proper group membership.
Opens a pop-up window that allows you to select groups to share the items to. In the pop-up window, mark one or more groups and click on the button. Unless you are an administrator, the pop-up window will only list groups where you are a member. It will not list groups that already have access to the items.
Opens a pop-up window that allows you to select projects to share the items to. In the pop-up window, mark one or more projects and click on the button. Unless you are an administrator, the pop-up window will only list projects where you are a member. It will not list projects that already have access to the items.
-
Opens a pop-up window that allows you to select permission templates. In the pop-up window, mark one or more templates and click on the button. Unless you are an administrator, the pop-up window will only list templates that you are allowed to use. It will not list templates that have already been added.
Note The permissions from the selected templates are copied to the items when the access permissions are saved. If you re-open the share dialog, the actual permissions are shown and the permission templates section is empty. Modifying the permission template later doesn't affect the permissions on existing items. See Section 7.3, “Permission templates” for more information about permission templates.
Click on this button to revoke access permissions from the selected users, groups and projects.
- Apply permissions to all sub-directories and their files
This option shows up if at least one of the selected items is a directory. If this option is selected the permissions given to the directory will recursively be copied to all files and sub-directories. Existing permissions on those items will be overwritten with the new permissions.
Use the button to save your changes or the button to close the pop-up without saving.
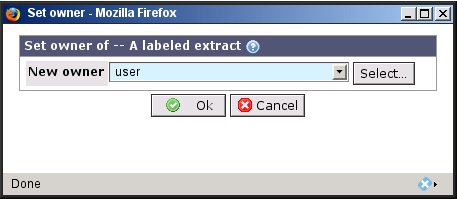
Sometimes it may be necessary to change the owner of an item. This can be done by everyone with Set owner permission on the item. For a user to have the rights to change owner of an item, the item must either be owned by or shared with Set owner permission to the user . See Section 6.3.5, “Share items to other users”.
An user with Set owner permission can go to a list view (or the single-item view), mark the checkboxes for the items to change owner of, and click on the button. A dialog window, like the screen-shot below, will appear.
- New owner
The user to be the new owner of selected item(s). By default the current user will be selected but other users can be picked from the currently used part of the drop-down list or by clicking on .
Use the button to set the new owner or the button to close the pop-up without saving.
|
Note |
|---|---|
The original owner may not have access permissions to the items any longer. If that is desired, the new owner must share the items to the original owner. |
This has a chapter of it's own. See Chapter 20, Export of data.