Table of Contents
Arrays are at the core of the BASE business and are essential elements to describe in order to be MIAME compliant. It is also critical to track and manage information about microarray design as accurately as possible since mistakes could prove extremely costly in downstream analysis.
As a good practice, all array related information should be entered into BASE prior to work on describing the sample processing and hybridizations events making up a microarray experiment is begun.
BASE is engineered to support microarray printing facilities. The system therefore offers objects to describe plates, their geometries, and the events (e.g., merging and printing) affecting them. The first section of this chapter deals with this functionality as well as plate management. Users buying arrays from commercial sources can ignore the plate management component and immediately jump to Section 16.2, “Array designs”.
Array designs should be understood as a plan which can be realized during a printing process producing microarray slides. During the course of the printing process, reagents may run out leading to the interruption of this process. All slides created during this printing process belong to the same printing batch. It is the array slide that will eventually be used in a hybridization event. BASE allows user to track those 3 entities with great details. This is an important functionality for users producing their own arrays and for those caring for quality control and tracking of microarray slides in a printing facility. The following sections detail how to use BASE to help in these tasks.
![[Tip]](../../gfx/admonitions/tip.gif) |
Tip |
|---|---|
It's highly recommended to have read Section 6.3, “Working with items” before continuing with this chapter. |
Use → to get to the list page with array designs.
- Name
Provide an sensible name for the design (required).
- Platform
Select the platform / variant used for the array design. The selected options affects which files that can be selected on the Data files tab.
- Arrays/slide
The number of sub-arrays that can be placed on a single slide. The default value is 1, but some platforms, for example Illumina, has slides with 6 or 8 arrays.
- Description
Provide other useful information about the array design in this text area.
Click on the button to store the information in BASE or on the button to abort.
This allows you to input values associated to annotation types devised to refine array design description. Read more about annotations in Chapter 11, Annotations.
Importing features is an important step in order to fully define an array design. It should be noted that BASE does not enforce the immediate feature import upon creation of array design. However, it is STRONGLY advised to do so when creating an array design. Performing the import enables use of the array design in downstream analysis with no further trouble. It also matters when importing raw bioassay data and matching those to the corresponding array design.
Depending on which platform and/or data files you selected when you created the array design the process to import features is different. For example, if you selected the Affymetrix platform, which is a file-only platform, the feature information has already been extracted from the CDF file (if you selected one). If the selected platform doesn't extract information from the selected data file automatically this may be done manually by executing an import plug-in.
From the array design item view, click on the button and use the reporter map importer and an appropriate plug-in configuration when following the instructions in Chapter 19, Import of data. If the import run is successful, go to the array design list view. The Has features column will show Yes (db: x, file: y) where x is the number of features actually imported into the database.
![[Note]](../../gfx/admonitions/note.gif) |
Note |
|---|---|
The button only shows up if the logged in user has enough permissions. |
|
Verify that probsets in a CDF file exist as reporters |
|---|---|
File-only platforms, such as Affymetrix, require that all probesets must exist as reporters before data can be analysed. For other platforms this is usually checked when importing the features to the database. Since no import takes place for file-only platforms, another manual step takes it place. Use the button in the array design item view and select the Affymetrix CDF probeset importer plug-in. If you have enough permissions this function will also let you create missing reporters. |
Beside the common way of creating items in BASE, an array batch can also be created directly from an array design, both in list view and single item view.
- In list view of array design
-
Click on the
 icon available from the
Batches
column of the array design you want to use.
icon available from the
Batches
column of the array design you want to use.
Tip As default in BASE the Batches column is hidden and need therefore be made visible first, see Section 6.4.3, “Configuring which columns to show”
is the corresponding button in single item view. The current array design will automatically be filled in the array design property for the new batch.
- Name
The name of the array batch (required).
- Array design
Array design that is used for the batch.
- Print robot
The print robot that is used.
- Protocol
The printing protocol that was followed when producing the array batch
Click on the button to store the information in BASE or on the button to abort.
See Chapter 11, Annotations for information about annotating items and inherit annotations.
How many slides each batch has can be found in the Slides column, list view page.
Use → to get to the list page of array slides.
In BASE, array slides can be created, except the common way, by 2 routes:
- from the array batch list page
Clicking on the
icon in the
Slides
column for the batch you want to add a slide to. Corresponding button in
the view page of a batch is
.
- using a wizard to create multiple slides simultaneously
-
This can be started from three different places:
array batch list view by clicking on
 in the
Slides
column of the batch that should be used.
in the
Slides
column of the batch that should be used.
Using the in a single item view of an array batch.
In the list page of array slides, using the button
The wizard is described further down in the section called “Multiple slides wizard” .
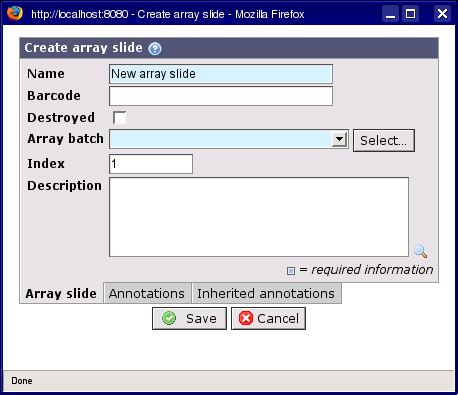
- Name
The name of the array slide (required).
- Barcode
Does the array slide have a barcode, it can be put here.
- Destroyed
This check-box can be ticked to mark the slide as destroyed, lost or damaged.
- Array batch
Array batch that the slide belongs to (required).
- Index
The index of the array slide in selected array batch.
- Description
Any information useful information about the slide can be in this field.
Click on the button to store the information in BASE or on the button to abort.
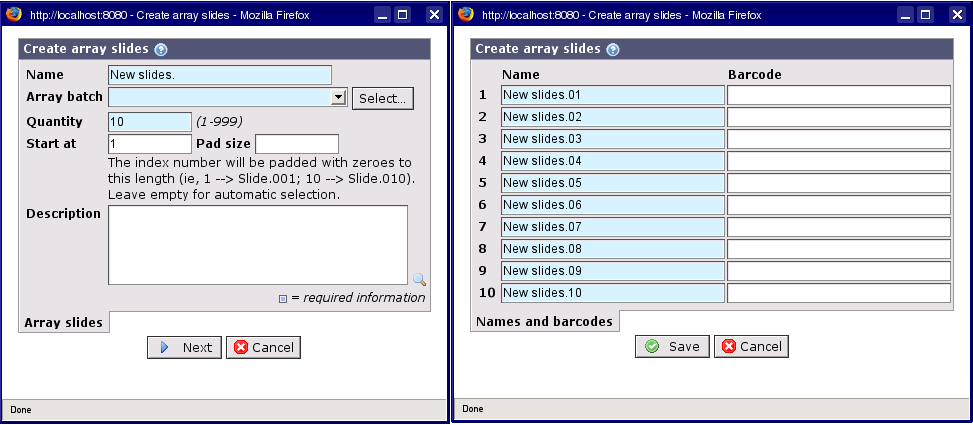
As mentioned above there is an alternative to create one slide at a time if you have many to add. There is a wizard that can help you to create at the most 999 slides in one go. The wizard is in two steps, both showed in the picture Figure 16.2, “Create multiple array slide” .
-
The first step reminds alot of the normal edit window of an array slide, but there are some differences:
- Quantity
Number of slides to create with this wizard (required and must be between 1 and 999)
- Start at
The index number to start from when indexing the name of the slides.
- Pad size
The index will be filled out with zeros in front to always have this length.
Press to continue to next step of the wizard.
![[Important]](../../gfx/admonitions/important.gif)
Important Be sure to get everything right before proceeding, because it is not possible to go back from step 2.
In step 2 should the barcodes for the array slides be entered, for those which have one. The autogenerated names of the slides can also be changed if that is wanted, as long as no name-field is left empty.
Fill in the necessary information as exhaustively as possible.
Click on the button to store the information in BASE or on the button to abort.
See Chapter 11, Annotations for information about annotating items and inherit annotations.