A Raw bioassay is the representation of the result of analysing one or more images from a Scan. This typically generates a raw data file with lots of measurements for the spots on the hybridization.
Creating a new raw bioassay is a two- or three-step process:
Create a new raw bioassay item with the New button in the list view.
Upload the file(s) with the raw data and attach it/them to the raw bioassay.
The used platform may require that data is imported to the database. See Chapter 19, Import of data. If the platform is a file-only platform, this step can be skipped.
![[Note]](../../gfx/admonitions/note.gif) |
Supported file formats |
|---|---|
| BASE has built-in support for most file formats where the data comes in a tab-separated (or similar) form. Data from one hybridization must be in a single file. Support for other file formats may be added through plug-ins. |
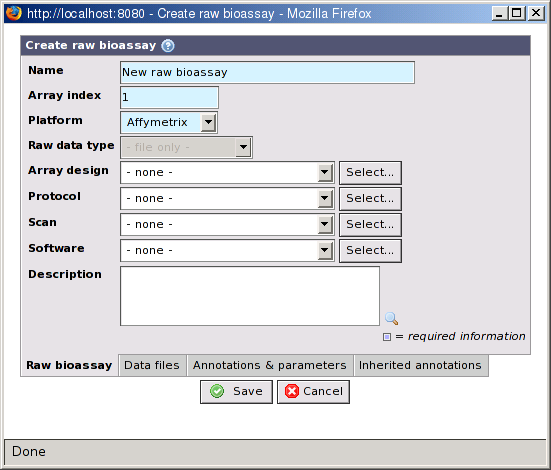
- Name
The name of the raw bioassay.
- Array index
The index of the sub-array on the hybridization this raw bioassay's data is linked with. The default value is 1. With some platforms, for example Illumina, which has slides with 6 or 8 arrays the value should be changed to reflect the correct sub-array. This information is important to link the raw bioassay with the correct biomaterial entries.
- Platform
Select the platform / variant used for the raw bioassay. The selected options affects which files that can be selected on the Data files tab. If the platform supports importing data to the database you must also select a Raw data type.
- Raw data type
The type of raw data. This option is disabled for file-only platforms and for platforms that are locked to a specific raw data type. This cannot be changed after raw data has been imported. See Section 18.2.3, “Raw data types”.
- Array design
-
The array design used on the array slide (optional). If an array design is specified the import will verify that the raw data has the same reporter on the same position. This prevents mistakes but also speed up analysis since some optimizations can be used when assigning positions in bioassay sets. The array design can be changed after raw data has been imported, but this triggers a new validation. If the raw data is stored in the database, the features on the new array design must match the the raw data. The verification can use three different methods:
Coordinates: Verify block, meta-grid, row and column coordinates.
Position: Verify the position number.
Feature ID: Verify the feature ID. This option can only be used if the raw bioassay is currently connected to an array design that has feature ID values already.
In all three cases it is also verified that the reporter of the raw data matches the reporter of the features.
For Affymetrix data, the CEL file is validated against the CDF file of the new array design. If the validation fails, the array design is not changed.
- Scan
The scan this raw bioassay is related to (optional). Changing this property will also update the value in Array design, but only if the selected scan is connected to an array design and the current user has permission to view it.
- Software
The software used to analyse the image or images (optional).
- Protocol
The protocol used when analysing the image(s) (optional). Software parameters may be registered as part of the protocol.
- Description
A description of the raw bioassay (optional).
A raw bioassay can have annotations. Read more about this in Chapter 11, Annotations.
Depending on the platform, raw data may have to be imported after you have created the raw bioassay item. This section doesn't apply to file-only platforms. The import is handled by plug-ins. To start the import click on the button on the single-item view for the raw bioassay. If this button does not appear it may be because no file format has been specified for the raw data type used by the raw bioassay or that the logged in user does not have permission to use the import plug-in or file format. See Chapter 19, Import of data for more information.
|
File-only platforms |
|---|---|
| File-only platforms, such as Affymetrix, is handled differently and data is not imported into the database. See the section called “File-only platforms”. |
A raw data type defines the types of measured values that can be stored for individual spots in the database. Usually this includes some kind of foreground and background intensity values. The number and meaning of the values usually depends on the scanner and software used to analyse the images from a hybridization. Many tools provide mean and median values, standard deviations, quality control information, etc. Since there are so many existing tools with many different data file formats BASE uses a separate database table for each raw data type to store data. The raw data tables have been optimized for the type of raw data they can hold and only has the columns that are needed to store the data. BASE ships with a large number of pre-defined raw data types. An administrator may also define additional raw data type. See Appendix E, Platforms and raw-data-types.xml reference for more information.
BASE 2.5 introduced a generic way to keep the data in files instead of having to import it to the database. In older BASE versions this ability was limited to the Affymetrix platform. The reason for keeping the data in files is that the number of spots tend to grow, which may result in bad performance if the database should be used. A typical Genepix file contains ~55K spots while an Affymetrix file may have millions.
The drawback of keeping the data in files is that none of the generic tools in BASE can read it. Special plug-ins must be developed for each type of data file that can be used to analyze and visualize the data. For the Affymetrix platform there are implementations of the RMAExpress and Plier normalizations available on the BASE plug-ins web site. BASE also ships with built-in plug-ins for extracting metadata from Affymetrix CEL and CDF files (ie. headers, number of spots, etc).
Users of other file-only platforms should check the BASE plug-ins website for plug-ins related to their platform. If they can't find any we recommend that they try to find other users of the same platform and try to cooperate in developing the required tools and plug-ins.
If you have uploaded the image or images from the scan you may create spot images. Spot images allows you to view the image of each spot separately in the analysis. For this to work the raw data must contain the X and Y coordinates of each spot.
After raw data has been imported into the database you will find that a button appears in the toolbar on the single-item view for the raw bioassay. Click on this button to open a window that allows you to specify parameters for the spot image extraction.
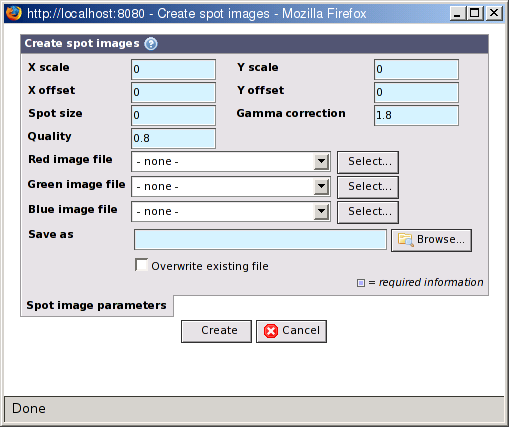
- X/Y scale and offset
-
For the spot image creation process to be able to find the spots, the X and Y coordinates from the raw data must be converted into image pixel values. The formula used is:
pixelX = (rawX - offsetX) / scaleX![[Important]](../../gfx/admonitions/important.gif)
Important It is important that you get these values correct, or the spot image creation process may fail or generate incorrect spot images. - Spot size
The spot size is given in pixels and is the width and hight around each spot that is large enough to contain the spot without having too much empty space or neighbouring spots around it.
- Gamma correction
Gamma correction is needed to make the images look good on computer displays. A value between 1.8 and 2.2 is usually best. See http://en.wikipedia.org/wiki/Gamma_correction for more information.
- Quality
The quality setting to use when saving the generated spot images as JPEG images. A value between 0 = poor and 1 = good can be used.
- Red, green and blue image files
-
You must select which scanned image files to use for the red, green and blue component of the generated spot images. Use the buttons to select existing images or upload new ones. The original image files must be 8- or 16-bit grey scale images. Some scanners, for example Genepix, can create TIFF files with more than one image in each file. BASE supports this and uses the images in the order they appear in the TIFF file.
Note Avoid TIFF images which also contains previews of the full image. BASE may use the wrong image with an error as the result. If you have multi-image TIFF files these must only contain the full images. - Save as
Specify the path and filename where the generated spot images should be saved. The process will create a single zip file containing all the images.
- Overwrite existing file
If a file with the same name already exists you must mark this checkbox to overwrite it.
Click on the button to add the spot image creation job to the job queue, or on to abort.